|
|
|
|
|
Request Error Solution
Role: Problem Support
Reference user : -REF-PRS
Process: Requesting the error solution
When the proposed error solution has been accepted by the Problem Manager, the actual solution has to be requested / ordered. Therefore special activities or a RFC/Change ticket have to be created and linked to this problem ticket.
After the implementation of the solution, it is necessary to check whether the error has been rectified. If the answer is positive, the Problem ticket can be closed, otherwise the error solution is declined and a new error solution must be ordered.
- The Problem does not have to be taken over by the Problem Supporter for further editing because he/she already is responsible for this problem and therefore becomes the current "worker" again. Now the user can again document the solution request in a separate ticket description (if necessary).
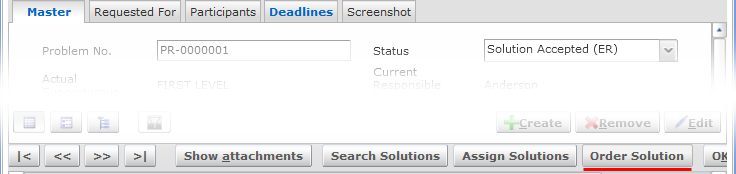
- Use the Order Solution action to set the ticket from status 'Solution Accepted (ER)' to 'Solution Ordered (ER)'. Performing this action is again registered in the ticket description (history).
- To carry out the real solution, two different actions can be started. Either
- Create one or more activities (in the Activities tab of the ticket) for individual solution actions. Or
- Create and link a RFC / Change Ticket(s) using the Create Change action on the Superior RFCs / Changes tab.
Now it is necessary to hold off further work on of the Problem ticket until the change is completed. If needed, a specific follow-up date can be specified for the Problem ticket.
- RFC / Change has been completed. The next step is to carry out and document the Post Implementation Review (PIR), do so by calling the Review Solution action.

The result of the PIR can be additionally documented in another ticket description (optional).
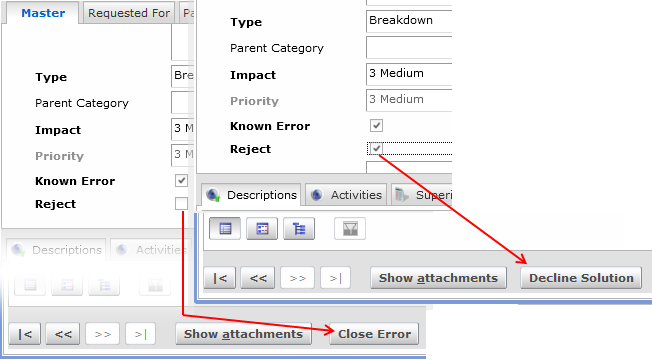
- It the result of PIR is positive, then error work can be completed by clicking the Close Error button. If not, then rework of the error solution processing should be initiated by calling the Decline Solution action. To decline the solution, tick the Reject check box on the Master tab of problem editor and state reasons for rejection in the Reasons for Reject text box dynamically displayed upon ticking the Reject check box. Then click the Decline Solution button (at the bottom of the Problem editor) to ends the problem process.
- The problem resolution has been completed now. Next complete the whole problem processing by clicking the Close Problem button.
Note: All related incidents and problems are also automatically set to status 'Solved' (depending on configuration). All related Workarounds should also be finished.