|
|
|
|
|
The editor actions are usually located at the bottom of the editor but sometimes it may be practical to add an editor action in the view next to a specific control which it logically relates to. In the View Designer, now it is possible to select a specific editor action and place it beside a specific view element or have it positioned directly on an existing view element.
Adding a Single Action
To add a single action to the view on a separate view element:
- Switch to the 'Group Layout' tab in the View Customizer.
- Click the 'Add Action(s)...' button.
The Action browser appears.
- Select the requested action.
Note that the actions available in the browser depend on the existing customization. If there is already a specific set of actions defined only for this view, only this set is available. If not defined, you will be offered the more general set of actions defined for the parent object type. If this definition is also missing, you will see the general set of editor actions which you can pick from.
- Click 'OK' to proceed.
The action has been added into the view as a new view element with a single action.
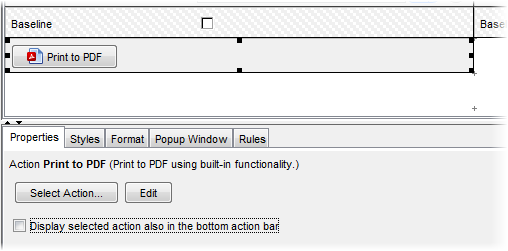
The single action element has the following properties:
- Select action
Call the Action browser where you can select a different action for this view element.
- Edit
Calls the Action Customizer where you can edit the action.
- Display selected action also in the bottom action bar
If selected, the selected action will be duplicated and available in the bottom action bar.
Note: The actual visibility of the action is determined by the existing action assignments (state, mode, rules...) in the Action Customizer.
If you repeat the process of adding another single action to the view, the new action will be added to a new element. When you select two or more independent elements in the view, the 'Merge actions' button appears temporarily below the existing the control buttons. If you click the button, the action buttons on the selected view elements will be merged into one group and will form a toolbar on a single view element. Similarly, you can merge two or more toolbars or move the toolbar to a Group.
To add an action on the existing view element:
- Select the view element in the view designer and go to the Properties of the element below.
- Click the 'Select Action' button.
The Action browser appears.
- Select the requested action.
Note that the actions available in the browser depend on the existing customization. If there is already a specific set of actions defined only for this view, only this set is available. If not defined, you will be offered the more general set of actions defined for the parent object type. If this definition is also missing, you will see the general set of editor actions which you can pick from.
- Once selected, 'Edit' and 'Remove' buttons appear on the Properties tab.
- Click 'OK' to proceed.
The action has been positioned at the right edge of the existing view element.
Notes:
- The actual visibility of the action is determined by the existing action assignments (state, mode, rules...) in the Action Customizer.
- An action cannot be added to a view elements with relation actions.
- When an element gets hidden (e.g. by a view rule), the associated button is also hidden.
Adding Multiple Actions
To add multiple actions to the view on a separate view element:
- Switch to the 'Group Layout' tab in the View Customizer.
- Click the 'Add Action(s)...' button.
The Action browser appears.
- Multiselect the requested actions.
Note that the actions available in the browser depend on the existing customization. If there is already a specific set of actions defined only for this view, only this set is available. If not defined, you will be offered the more general set of actions defined for the parent object type. If this definition is also missing, you will see the general set of editor actions which you can pick from.
- Click 'OK' to proceed.
The actions has been added into the view as a new view element with multiple actions.

The multiple action element has the following properties:
- Dropdown Button
One of the options for multiple actions: Groups the actions under a single drop-down button.
- Toolbar
The other option for multiple actions: Displays the actions side by side as a toolbar on the view element.
- Button Alignment
Enables you to specify the left, center or right position of the action buttons on the view elements.
Other options:
All of the actions added to the view element are also listed in the small window here on the Properties tab. You can perform other operations such as adding even more actions to the view element using the 'Plus' button, sort the actions in the group using the arrow buttons, edit the selected action in the Action Customizer or simply remove the selected action.
- Button Alignment