|
|
|
|
|
This topic deals with the specifics of rich text control customization. The implementation of a rich text control is done on three levels: Database table, object type and the actual editor or catalog.
- Database
Rich text control uses two object type attributes and, consequently, needs two database columns. These two columns have to be of the same type and length, and their names have to follow a specific naming convention: 'name' and '_rich'.
For example, if one of the columns was named 'description', then the other should be named 'description_rich'.
If a suitable plain text attribute already exists, it is possible to "upgrade" it to a rich text attribute by adding a complementary rich text column following the above mentioned naming convention.
When formatted text is entered in the rich text editor, it is also automatically converted into plain text and saved in the 'parallel' plain text field. Formatting is removed when rich text is converted into plain text except for <br> tags which get converted to 'endOfLine'.
- Object Type Customizer
When the correct database columns are in place, they are displayed in the object type customizer as one attribute of a compound name consisting of both used columns, e.g. 'description / descriptionRich'. This type of attribute is also differentiated from other attributes by a black dot in the 'icon type' column.
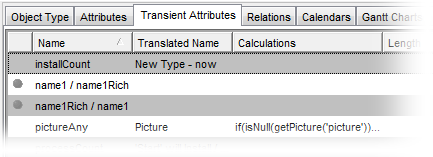
Transient rich text attribute: A transient rich text attribute does not need database support and thus can be created directly in the Transient Attributes tab of object type customizer by creating two complementary attributes. You will need to close and reopen the object type customizer for the rich text attribute creation to apply.
The fact that the two attributes form a plain text/rich text attribute pair is denoted by a dark gray dot in the first column of the attribute list. If one of the paired plain text/rich text attributes is deleted, the remaining attribute becomes a "normal" plain text attribute. Conversely, an already existing plain text attribute can be upgraded to rich text by adding its rich text counterpart.
- View Customizer
Now the rich text attribute can be used in Valuemation views. It is listed in the Available Attributes column on the Group Layout tab of View Customizer and distinguished from other attributes in the list by a black dot.
When this attribute is added to the view, the corresponding view component automatically receives the 'Richtext editor' formatter. This is the default and correct formatter for a rich text control. Edit the formatter properties as you would for any other new component, with the following specifics:
- The Rich text editor can only be enabled on Valuemation web client (check box Enabled on the Formatter Data tab). Regardless of this setting, rich text editor is always disabled on Valuemation rich client. Note that 'disabled' in this context means 'not editable', i.e. the control is grayed out, the data is displayed but cannot be edited.
Note: Editing in the rich text field is disabled for the rich client because rich client can use only plain text formatting and thus editing the field here would disrupt existing rich text formatting created on the web client.
- The Rich text editor is placed on a new line by default (the check box Locate on a new line on the Layout Data tab) and uses both view columns (the check box Use Both Columns (only available in the rich client) on the Layout Data tab). Default height of the rich text control is 400 pixels.
See the 'Formatter: RichText' topic for complete information on formatter settings.
- The Rich text editor can only be enabled on Valuemation web client (check box Enabled on the Formatter Data tab). Regardless of this setting, rich text editor is always disabled on Valuemation rich client. Note that 'disabled' in this context means 'not editable', i.e. the control is grayed out, the data is displayed but cannot be edited.
- Catalog Customizer
Rich text attribute can also be used in the multiline catalog layout. In the Multiline Designer tab of Catalog Customizer, the rich text attribute can be dragged from the list of available attributes to the design grid. If a rich text attribute is used in other catalog modes or in the query tab, it is displayed as plain text.
Rich Text Toolbar Controls
The content of the rich text control toolbar (i.e. available buttons and their placement) is determined by used web component and cannot be customized in Valuemation.
|
Pre-selection of the Rich Text field content
Additionally, it is possible to configure whether the content of rich text fields is selected or not when the field is focused. It can be defined globally by a mainparameter and also for an individual client by client settings.
Global setting:
Set mainparameter (Path: 'VMWeb' / Parameter: 'selectOnFocusInTextarea')
- value set to 'true': on focus the content of the rich text area is selected
- value set to 'false': on focus only the cursor is put inside the text area but the content is not selected
The default value is 'true'.
User-dependent setting:
User-dependent setting is done in the 'Client Settings' dialog of Valuemation web client.
- In Valuemation web client, click the 'Settings' menubar icon.
- Select the 'Client Settings' tab.
- Use the 'Select value on focus in text area' check box to set the behaviour as described above.