|
|
|
|
|
Emergency Transfers
The Customization Transfer manager enables you to override the sequence number and import an "emergency change" directly if necessary. Please see also the CTM Features and Processes topic for details.
It is recommended that you use this feature for real emergencies only (the "showstoppers"). If not used properly, the emergency transfers can easily cause various conflicts which have to be tracked and resolved. It is also recommended that the regular bug-fixes and customizations should be handled in sequence without the "emergency" settings.
Example: Emergency Transfer in Use
Preconditions
- Make some customization changes. For example, create a new translation in the Translation Editor and make a change in the 'Create New Ticket' workflow.
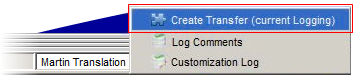
- Create Transfer for the simple translation.
- Create Transfer for the 'Create New Ticket' workflow.
- Commit the customizations to the Master database.
- Now open the 'Transfer Orders (all)' catalog. Here you can see the order of upcoming transfers (without the Package context).

Setting the Emergency Transfer
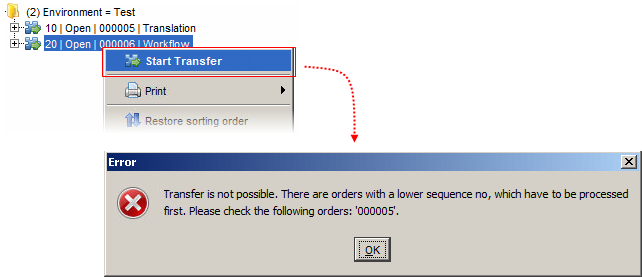
As a next step, now you would start the Transfer to the (Test) Environment. Usually the transfers would go in the correct succession. It means the 'Translation' would be imported first and the 'Workflow' as the second item. Now for some reason, you have decided that the 'Workflow' transfer must be imported first as an urgent, emergency transfer.
When trying to skip the transfer order manually by selecting 'Start Transfer' from the menu, the import will be declined.
|
To override this limitation, you need to mark the proper Customization Object as an emergency.
To do so, proceed as follows:
- Open the 'Customization Objects' catalog from the sidebar.
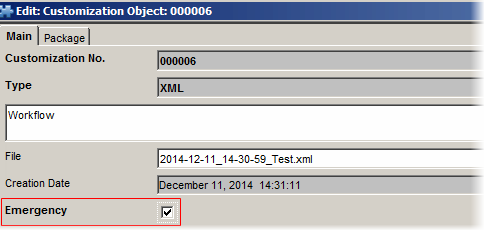
- Find the desired Customization Object in the catalog (it is the one with the workflow change in this example).
- Open the Customization Object in the editor and mark it as an emergency by selecting the 'Emergency' check box.
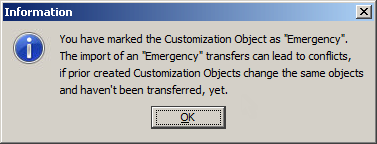
- Click 'OK' in the warning message to confirm that you are aware of the possible risks of the emergency transfer.
- Now that you open the 'Emergencies (all)' catalog, you can find your Customization Object here ready to be imported to the 'Test' Environment.
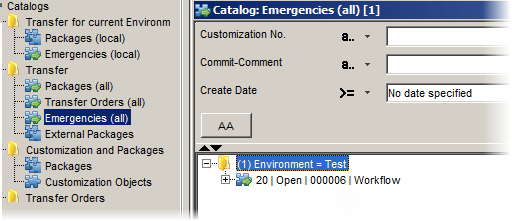
- Double-click the Customization Object to call the Importer dialog box.
- Click the 'Import' button to import the customization change. Now it will be imported first despite the fact that there is another one with the lower sequence number.
Importing the Emergency to other stages
You can proceed and execute the import to other stages available as well. When you open or refresh the 'Emergencies (all)' catalog again, you can see that it is possible to import to other stages too (to 'Integration' and 'Production' Environment in this example).
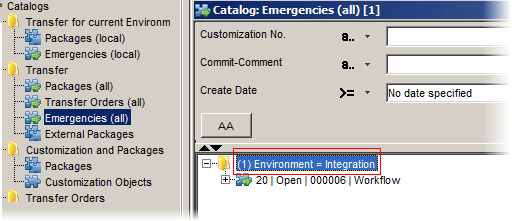
To do so, please repeat the steps 5-7 for the 'Integration' Environment first, then for the upcoming 'Production' Environment.
|
Executing the import in the correct sequence
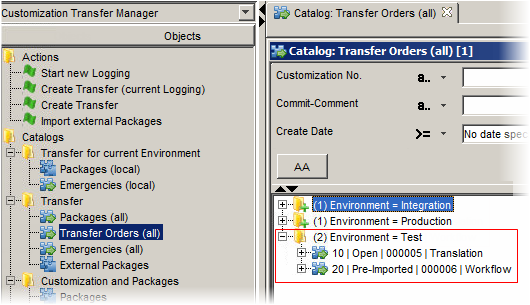
Now in the 'Transfer Orders (all)' catalog, you can see that there are two Transfer Orders for the 'Test' Environment: The "old" Translation transfer and the transfer for the Workflow. Since the 'Workflow' has been imported as the 'Emergency', it will be marked as "Pre-Imported" here. It means that it has to be imported again in the correct sequence.
|
To execute the import in the correct sequence now, proceed as follows:
- Double-click the 'Test' Environment in the 'Transfer Orders (all)' catalog.
The 'Importer' dialog box opens.
Note that now that we are importing two changes, the dialog box is displayed as the 'Multi-Importer' dialog box.
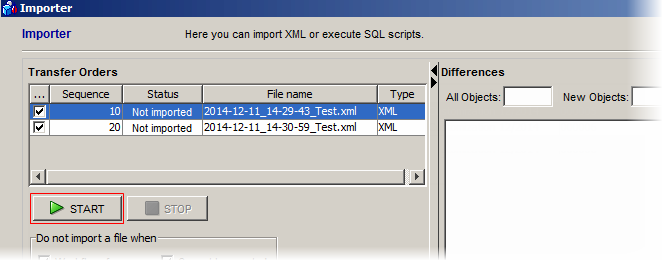
- Click 'Start' to initiate the import.
The batch import for all selected files will be started. If some conflicts occur, the operation will be interrupted.
- Proceed in the same way for the other Environments (i.e. the 'Integration' and 'Production' Environment in this example).
Note: Some Packages may require to be approved prior to the import. If this scenario occurs, go to the 'Packages' catalog and select 'Approve' from the menu on the specific Package.