|
|
|
|
|
Putting Customization on Hold
The Customization Transfer Manages allows you to put a customization on hold when necessary. It should be noted that this is a rather rare case which is used under specific conditions only.
Example:
Preconditions
A customizer is working on special topic. Some issues, which cannot be fixed until the deployment day, were found during the testing after the customization had been imported into the Test Environment. If the customization is separated from any other ongoing customizations, it is possible to put the customization on hold at this stage so that the issues found in the separate customization can be fixed later (i.e. after the deployment day).
|
Important notes
- It must be pointed out that this action has to be considered very well as it requires good knowledge of the open customization.
- It should be done before the integration stage imports are executed.
- It has to be ensured that all and only the customization in question is assigned to the same package.
- The customization can be opened again at a later point once the issues have been resolved.
Putting a customization on hold
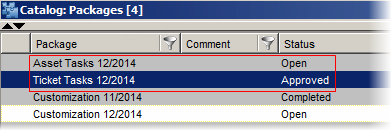
- There are two packages: 'Asset Tasks' and 'Ticket Tasks'.
Both the packages are in the 'Open' status which means that they are being worked on.

- The customizer of the 'Asset Tasks' package transfers his customization into the Master Environment.
- The customizer of the 'Ticket Tasks' package transfers his customization into the Master Environment.
- Having finished their tasks, the customization changes need to be tested so they need to be transferred into the Test Environment, too.
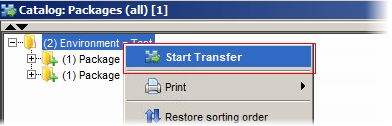
- Start the transfer by selecting 'Start Transfer' from the menu in the 'Packages (all)' catalog.
After they were added into the Test Environment (and are being tested), you can see in the 'Packages (all)' catalog that now there are the two customization packages ready for the integration. When you try to import it, the import would be declined and a warning message stating a requirement for an approval appears.

- Now only the 'Ticket Tasks' package will be approved.
Go to the 'Packages' catalog and select 'Approve' from the menu on the 'Ticket Tasks' package.
The 'Asset Tasks' package remains open.
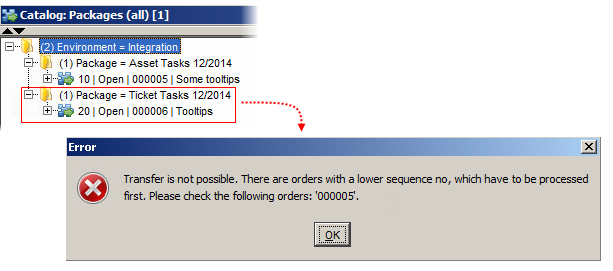
- Now that the 'Ticket Tasks' package has been approved, you want to import it into the (next) Integration Environment. However, the import of the 'Ticket Tasks' is not possible because of the unapproved 'Asset Tasks' package. Also note that the The 'Ticket Tasks' are coming after the 'Asset Tasks' package by the sequence number.
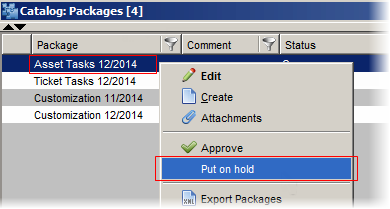
At this stage the content of the Packages is usually checked to make sure they can be separated. If they are not associated anyhow by their content, the 'Asset Tasks' package will be put on hold.
- To put the 'Asset Tasks' package on hold, select 'Put on hold' from the menu on the package.
- If you go back to the 'Packages (all)' catalog, there will be just the 'Ticket Tasks' package available.
- Now you are allowed to import the 'Ticket Tasks' package into the Integration Environment without a problem.
Similarly, it is possible to continue with the import into the other Environments which have been defined.
Continuing with the "put-on-hold" customization
In the next deployment period, the 'Asset Tasks' package, which is still in the 'On hold' status, must be resolved.
To continue with the package, do the following:
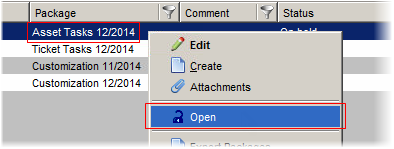
- Open the package by selecting 'Open' from the menu on the package in the 'Packages' catalog.
- Now you can make the necessary fixes or/and continue with the customization.
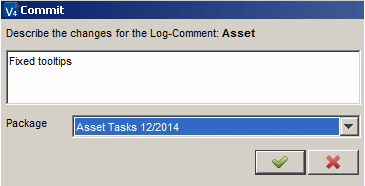
Note: Make sure you are customizing under the correct Log Comment.
- When ready, transfer the customization by selecting 'Create Transfer'.
By selecting the 'Create Transfer' action, the Development Environment with the Master Environment will be compared and the process of creating a Customization Object for the current Log Comment will be started.
- Click the 'Export' button to initiate the export of the XML file to the selected destination.
- Continue with the import of the customization to the Master database as described in the 'Registering a Customization Change in CTM' topic.
Note: Make sure you assign the correct Package in the 'Commit' dialog box.
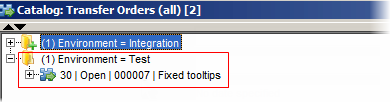
- If you check the Transfer Orders now in the 'Transfer Orders (all)' catalog, you can see that the file is ready for the import into the Test Environment.
- Now you can import the file into the Test Environment in a usual way.
- After you 'Approve' the package in the 'Packages' catalog, it is possible to continue with the import into the other Environments.
- If you go back to the 'Packages (all)' catalog, there will be the 'Asset Tasks' package available. Now you can import the 'Asset Tasks' package into the Integration Environment without a problem.
- To import the package, start the transfer by selecting 'Start Transfer' from the menu in the 'Packages (all)' catalog. The MultiImporter dialog box appears.
- Click 'Start' to import the changes into the Integration Environment.