|
|
|
|
|
Creating Customization Manually
It is also possible to add a customization and define the sequence manually. However, it should be noted that this is a rather special and rare case. Usually the manual operation is not necessary at all because the Customization Objects are created automatically when they are imported to the Master Environment and the sequence number acquirement is fully automated too.
Example:
Preconditions
A typical precondition for the need to create the Customization Object manually would be as follows:
- You have imported System.xml to the Master Environment without any problems.
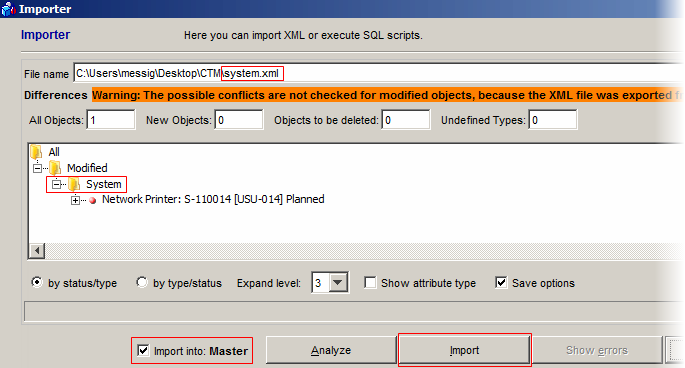
- Later you try to import to another Environment but it doesn't work because the System Usage Type.xml is missing for some reason.
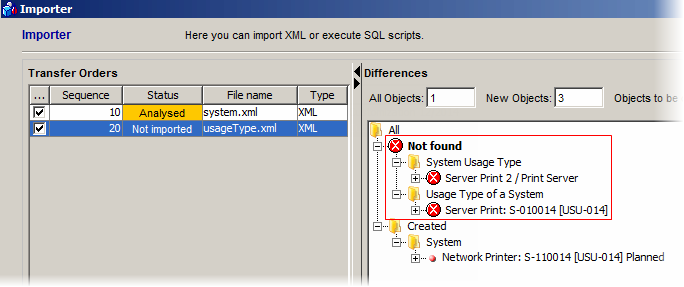
- Now you must export the missing type, create the Customization Object and define the sequence manually. Thus the System Usage Type.xml would be transferred prior to the System xml.
Creating the Customization Object manually
When you try to edit the appropriate Customization Object, you find out that it is not possible to edit the sequence number. Only the manual creation of the Customization Object allows you to define the sequence number which is what it is necessary to do in this case.
To create the Customization Object and define the sequence manually, do the following:
- Open the 'Customization Objects' catalog.
- Select 'Select File and Create' from the menu.
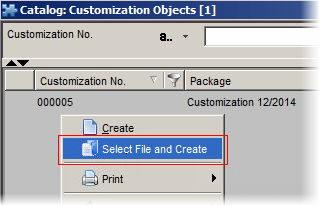
- Select and open the physical System Usage Type.xml file.
- Now a new Customization Object will be created but you can see that it doesn't have the Package assigned and the sequence number defined.
- To define the sequence number, edit the Customization Object and write the desired number in the Sequence field on the 'Main' tab. Note that to have the sequence in the correct order, the number five was defined here.

- To assign the appropriate Package, edit the Customization Object and assign the desired Package on the 'Package' tab.
Alternatively, you can also do the following:
- Open the 'Packages' catalog and select a Package.
- Select 'Create Customization Object' from the menu.
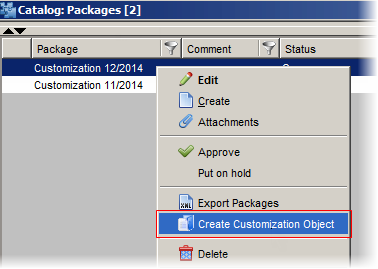
- Select and open the physical System Usage Type.xml file.
- A new Customization Object will be created with the Package assigned. Only the sequence number must be defined. To define the sequence number, edit the Customization Object and write the desired number in the Sequence field on the 'Main' tab as shown in the previous example.
Final (re)import
Now that the Customization Object was created manually (with the sequence number defined and the Package assigned), you can proceed to the final import. Before you do that, you must adjust the Transfer Orders accordingly, too.
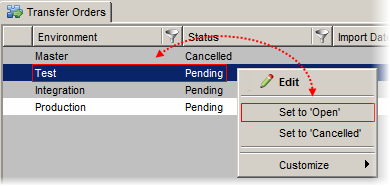
In our example, it has been possible to import successfully to the Master and the problem started with the Test Environment. Therefore you can put the Master Environment into the "Cancelled" status. Then put the Test Environment into the "Open" status again:
- Select 'Set to Open' ('Set to Cancelled' for the Master Environment) in the 'Transfer Orders' reference view of the Customization Object.
- Click the
 button to confirm and close the dialog box.
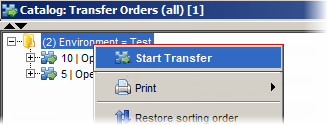
 - Now you can go back to the 'Transfer Orders (all)' catalog.
There are two tasks here again.
- Select 'Start Transfer' from the menu.
The MultiImporter dialog box appears.
You can see that the Transfer Orders are in the correct order now.
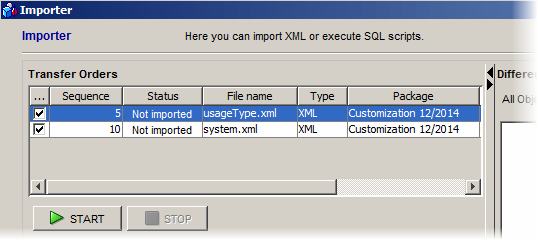
- Click the 'Start' button to execute the import. Both files will be imported into the Test Environment as specified.