|
|
|
|
|
Tree Layout Tab
When using a catalog, it is possible to switch between a Table View and Tree View data display. Catalog in a Tree View displays objects as expandable nodes. The Catalog Customizer Tree Layout tab contains a Catalog Tree Filter which enables you to customize anything that gets displayed when each particular node is expanded. The settings made here apply to the Tree view in both the Rich and Web Valuemation client.
Note: If there is no tree filter defined, the user can see all attributes and related objects according his authorization.
Structure of the Tree Layout tab
- Catalog Tree Filter (A)
The left-hand side of the dialog box lists all available attributes and relations of the catalog object type. The check box next to each attribute or relation is used to include this attribute or relation in the resulting tree layout.
- Tree Preview (B)
The tree preview can be seen on the right-hand side of the dialog box.
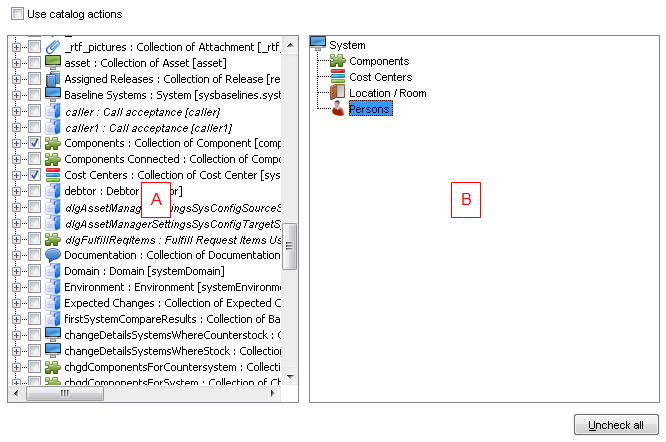
The Tree Layout tab of the catalog Customizer
There are two additional controls available on the dialog box:
- 'Use catalog actions' check box
If selected, the customizer will use catalog actions (on the right-click menu) for nodes representing business objects of the same business object type as the catalog. If clear, it will use just the typical relation actions (on the right-click menu). See below for details.
- The 'Uncheck All' button
Enables you to uncheck all selected nodes at once.
Working with the Tree Layout tab
In the Catalog Tree Filter (A), put a check mark next to the attribute or related object which should be visible in the catalog Tree View. As you progress, a preview of the resulting tree structure gets displayed in the right-hand pane (B). The two panes are synchronized: When a node in the filter is selected, the corresponding node in the tree preview is made visible and selected. Note that if no attribute is selected, then all attributes will be displayed in the Tree View.
Use the 'Uncheck All' button to clear all attribute check boxes. The context menu in the available attributes list provides the following options:
- Check selected
Puts check marks next to the selected items.
- Uncheck selected
Removes check marks from selected items.
- Invert checking
Inverts check mark status of selected items.
Selecting Related Objects
When an attribute of a relation node target object is selected in the filter, the relation node is also automatically selected. Additionally, it is possible to select only the relation node without selecting any of its target object attributes, in which case the node is displayed with the descriptive attribute of the target object as the node name.
Recursion
It is possible to define recursion in the tree filter. When a relation node is selected and its target object type is the same as an object type already selected in some of the parents of this relation node, the same filter from this parent will also be applied to the target object.
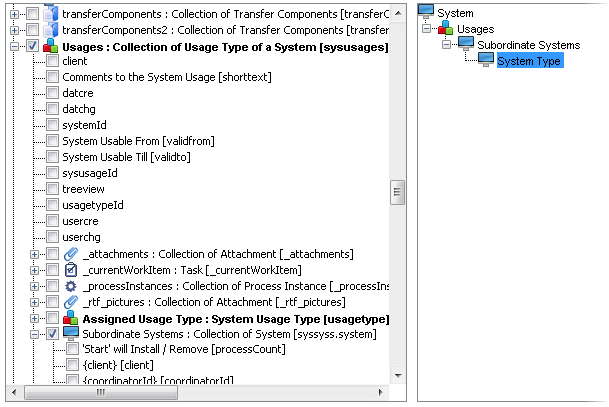
For example, let's consider a catalog of systems containing a subordinated system (see the image above). If none of the subordinated system's attributes is selected for inclusion in the Tree View, the structure of the subordinated system's tree will be inherited from the main system's tree structure.
|
Hiding the Link Objects
In order to make the resulting tree structure more transparent, it may be a good idea to exclude some of the link objects from the tree. Standard link objects are excluded automatically, link objects "with view" (see the explanation below) are normally included and may be excluded manually. To exclude the link object, simply remove its check mark in the tree filter. This possibility is allowed only when there is only one relation selected under the link object node.
When the node is unchecked, the following dialog box appears:
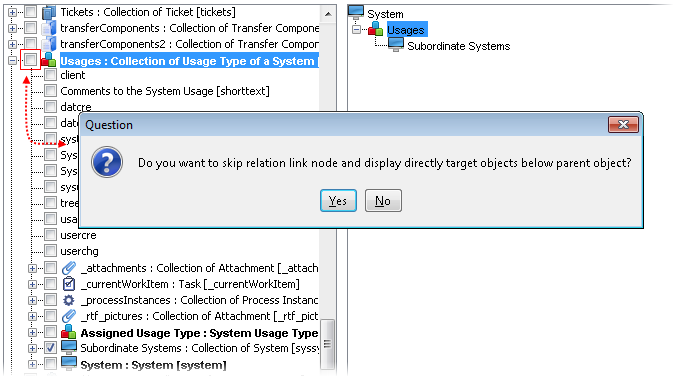
If you click 'Yes', the link relation will be joined with the next relation. If a translation for such structured attribute exists, it will be used for the name of this new structured relation node in the catalog. Taking this example a step further, the Usages link object may also be skipped, thus leading to a tree structure where subordinated systems are displayed directly below their superior systems:

|
Expandable Tree Nodes Behaviour
The presence of a 'plus' symbol at the left of the tree node signifies that the node can be further expanded. Clicking the 'plus' symbol itself then expands the node. If the node cannot be expanded, the plus symbol is not displayed.
The above described behaviour requires the application to read some extra information ahead in order to know how to display each individual node. If this turns out to be a performance issue, it is possible to disable the advance reading. With the reading disabled, the plus symbol is displayed by default in front of all nodes whether they can be expanded or not.
Use the following mainparameter to modify the behaviour:
- Tree.loadChildNodesOnExpand = false
The advance reading is enabled and thus the plus symbols is displayed only with expandable nodes.
- Tree.loadChildNodesOnExpand = true
The advance reading is disabled and thus the plus symbols is by default displayed with all tree nodes.
Explanation: Link Object Type With View
The 'Link object type with view' is a link object which contains additional information (such as role assignment etc.) and thus is likely to be assigned some kind of edit view. Link object types of this kind are not automatically excluded from the tree layout.
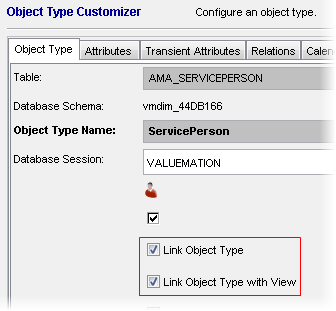
Service Assignment to Person: an example of a "link object type with view".
|
Condition on Relation Nodes
On the Tree Layout tab of the Catalog Customizer, it is also possible to define conditions on a relation node for the same object type. The conditions enables you to filter out objects being displayed.

Right-click a relation node to call the menu. The menu lists the following options:
- Edit condition
Calls a dialog box with a complex query editor. When a condition is defined for the relation, it will be displayed next to the node name and the 'Clear condition' action will be added on the right-click menu.
- Use catalog query
If selected, the catalog will be filtered according to the criteria defined on the 'Query Tab' of the Catalog Customizer.
- Use hidden condition
If selected, the catalog will be filtered according to the criteria defined by the hidden condition. This is the condition added via a transition or defined directly in the 'Open Catalog' activity.
- Use user condition
If selected, the catalog will be filtered according to the criteria defined by the user condition. This is the condition added via a transition or defined directly in the 'Open Catalog' activity. The user condition is represented by various search types available in the catalog (Column Search, Field Search etc.).
- Hide relation node of this relation
If selected, the relation node will be hidden and only the top node (the actual business object) of the relation will be visible.
Note: The 'Use catalog query', 'Use hidden condition' and 'Use user condition' menu options are available only if the node is of the same type as the catalog.
|
Using the 'Use catalog actions' checkbox
This option enables you to decide what kind of actions you would like to have on the right-click menu of the relation nodes. If selected, it will use catalog actions for the nodes representing business objects of the same business object type as the catalog.