|
|
|
|
|
Create an RM Project
The necessary prerequisites have been fulfilled - shifts have been generated and resources created. Now it is possible to create a resource management project.
- Open the 'Resource Projects' catalog.
- Call action 'Create' from the catalog right-click context menu.
- A catalog listing object types on which the resource can be based opens. (The name of the catalog 'Catalogs For RM Project' indicates that suitable catalogs listing objects of the supported object types are actually offered for selection.) Select one of the object types/catalogs (Ticket, Project, Process Instance) and click 'Ok'.
If you want to create an independent resource project, click the 'Skip' button in the bottom right-hand corner of the catalog. (An independent resource project is a resource project which does not reference an existing ticket, business project or process instance.)
- A catalog listing objects of the object type selected in step 3 opens. Use it to select the object on which the resource project will be based and click 'Ok'.
If object type selection was skipped in step 3, then step 4 is also skipped.
- An editor for creation of the new resource project opens. On the 'New' tab, provide project name and description. The 'Details' tab references the object on which the resource project is based. Here it is possible to remove the source object (i.e. remove the link between the resource project and the object), link another source object, open the source object for editing or even initiate the creation of a new source object.
Note that the use of a generic business project (aka 'Project') as a source object differs slightly from basing the resource project on a ticket or process instance. Unlike tickets and process instances, which usually reference some actual resources, linking a generic business project mainly extends the scope of information available for the resource project.
Next steps will be the assignment of resources to the RM Project and, finally, the creation of reservations belonging to the project.
- In the 'Resources' tab of the RM Project editor, assign resources to the resource project.
Call the 'Assign' action in the tab. A catalog of available RM Resources opens. Select the resources which should be made available for the RM Project and click 'Ok'.
- Use the 'Reservations' tab to plan and book resources utilization within the project.
- Right-click in the tab and call action 'Create'. A new row representing the first reservation gets created. Use inplace editing in the 'Task' column in the row to specify a name for the reservation.
- 'Start', 'Finish' and 'Duration' data are prefilled, the default prefilled values encompass the current day. Use inplace editing in the columns to specify actual planned resource utilization.
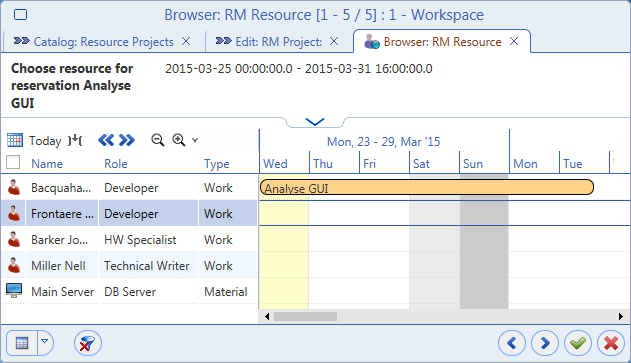
- Assign a resource to the reservation. Right-click in the row and call action 'Add resources'. A catalog of resources assigned to the project gets opened. By default, the catalog is displayed in the timeline view with the time period assigned to the given reservation visible (in the sense of 'currently visible' as explained here). This way it is possible to immediately see which resource are already booked for the period.
Select one or more available resources and click 'Ok'.
- Repeating steps 1 to 3, create all reservations in the project.
To create a reservation subsequent to an already existing reservation, make sure the previous reservation is selected when the 'Create' action is called. This way the new reservation will be automatically created so that it starts at the moment when the previous finishes.
Also remember that days are considered according to defined shifts. If shifts have been defined to include only work days (Monday through Friday), then a three-day duration starting on Friday ends on Tuesday the next week. By the same token, a day officially starting at 00:00:00 starts (for the purpose of resource planning) at the time specified by the shift definition (e.g. at 08:00:00).
At this point a resource project is created and filled with reservations. See 'Example of RM Project Creation' for an analysis of a "real-life" project.
The preferable way of working with reservations is in the timeline view. See topic 'The Timeline View' for details on using this mode of data display.