|
|
|
|
|
Using the Report Template Editor
When the Print-to-PDF action is called, the catalog or selected objects being printed use the template report which is default in the given context. If you want to print with a different report template or use your own print settings, you must use the "Print to PDF with" action from context menus (see also Starting Points).

Selecting the "Print to PDF with" action will launch a Report Template Editor. You can make your own report definition or select one of the listed report definitions to be used for the print action. Besides, you can set a default report template (which can be any template).
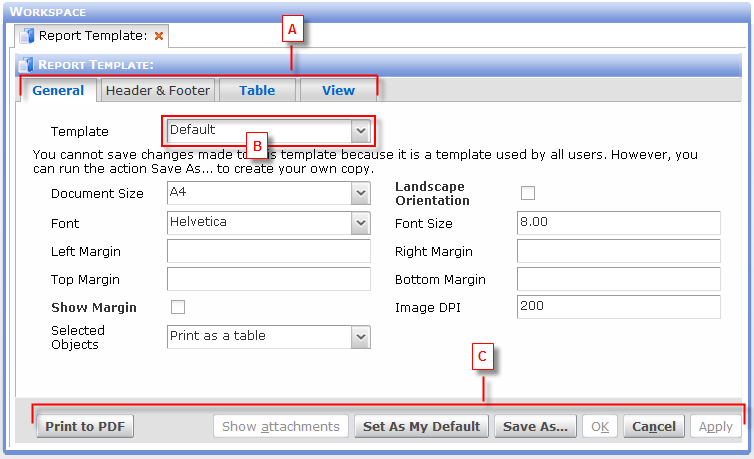
The Report Template Editor
General description of the Report Template Editor:
Section |
Description |
A |
Tabs allowing you to make various settings to the report template. As the names of the tabs suggest, you can set size of the document, margins, header and footer, table and view formats. After making the settings, you can save them as a new report template (which you can make default, too). |
B |
This combo box contains a list of available report templates. By default, only one "Default" report template is available (which cannot be modified, neither you can add attachments to it). You can save any number of new report templates based on your settings by using "Save As" button. A new template report can be set as "the default one" using the "Set As My Default" button. |
C |
Using the control buttons, you can carry out various operations in the Report Template editor. Print to PDF enables you to launch the PDF print immediately using the default report template. This is especially useful if you make some changes in the settings and want to see the results at once. Show attachments enables you to add, create or remove attachments from the report template. Set As My Default enables you to set the selected template (B) as the default one. Note that this setting is local only. Save As enables you to save your settings as a new report template. After you click the button, you will be prompted to enter a name of the new template. Then the template will be available in the Template combo box (B). NOTE: When you use Save As, the (potential) attachments are not copied. OK, Cancel, Apply are regular operation buttons working the way their name suggests. |
|
|
The settings specifying the final look of the print output are available on four tabs: