|
|
|
|
|
The Instantiation Wizard
The instantiation wizard opens when one of the following is called:
- Action 'Assign Business Partners...' from a service instances catalog
- Action 'Instantiate Service(s)...' from a service templates catalog or editor
The wizard guides the user through the process of service instances creation in a series of steps. Proceed in the following way:
Open a catalog of services, choose an approved service and call its context menu action 'Instantiate Service(s)...'. The instantiation wizard opens.
- Step 1: Choose support group(s) to be associated with the service instance. Multiple support groups can be assigned to one template instance. Additionally, the support group - service template assignment offers two parameters - 'Routing Option' and 'Role'.
- 'Role' enables assignment of support groups in various functional roles (e.g. as 1st level support, 2nd level support etc.)
- 'Routing Option' enables the association of specific customer groups with the assignment. If a routing option is specified, the business partners list for selection in the next wizard step is filtered to contain only members of the selected routing option(s).
See topic 'Support Groups Assignment' for details.
Important notes:
- The 'Choose Support Groups' step is offered also if your customization does not use the relation between support groups and services. In such case, simply click 'Next' to go to the next wizard step.
- If no support group is selected in the first step, the second wizard step will offer all available business partners (i.e. without any filtering).
- If one or more support groups are selected in the first step but these support groups contain no business partners (possibly the support group-business partner assignment is not used at all in your customization), the second step will offer no business partners (an empty catalog). In this case go back to the first step and delete the support group assignment(s).
- Step 2: Choose business partner(s) to be associated with the service instance. As the action is intended to offer a service to the customer, the business partner is always associated in the 'Consumer' role.
In the upper section of the wizard window you can see an overview of support groups selected in the previous step. The 'Customers' section at the bottom of the window facilitates selection of business partners for the instantiated service.
Click the '+' ('Search and assign existing Business Partner') button. A list of business partners pre-filtered by the previous selection of support groups(s) opens. Note that the list is filtered by all routing options assigned to the selected support groups, in an 'OR' fashion.
Select one or more business partners and click 'Next' to proceed to the next step - selecting a pricing model.
Note that it is possible to skip the step and create service instances without customer assignment. In this case pricing model assignment is also skipped and the wizard proceeds directly to service configuration.
- Step 3: Define Default Pricing Model.
In this step you are expected to assign a pricing model to the service instance being created for the business partner selected in the previous step. The assigned pricing model can also be edited or a completely new one created from the wizard.
If the service instance is being created without a business partner assignment (no business partner selected in the previous step), then pricing model selection is skipped.
Click 'Next' to proceed to the next step of the wizard - service configuration.
- Step 4: Configuration
Configure the service by selecting from available options.
- Select an option. The highest option is preselected. If all its sub-options are mandatory, the option does not get automatically expanded.
- Select optional add-ons.
Since version 5.1, the options tree contains also parameters which are not part of any option.
- Parameters assigned to an option can be found under the option (parameter 250MB Mailbox Size in the example image below).
- Parameters that do not belong to an option are listed separately under the options (the 'Outage...' and 'Database...' parameters in the image below).
- If a parameter belongs to a subordinated service, then it is listed in the form: 'name of subordinated service > parameter' (parameters 'Database > DB2 database' and 'Database > Oracle database' in the example image below).
The 'Reset Selector' check box clears all check boxes in the options selector.
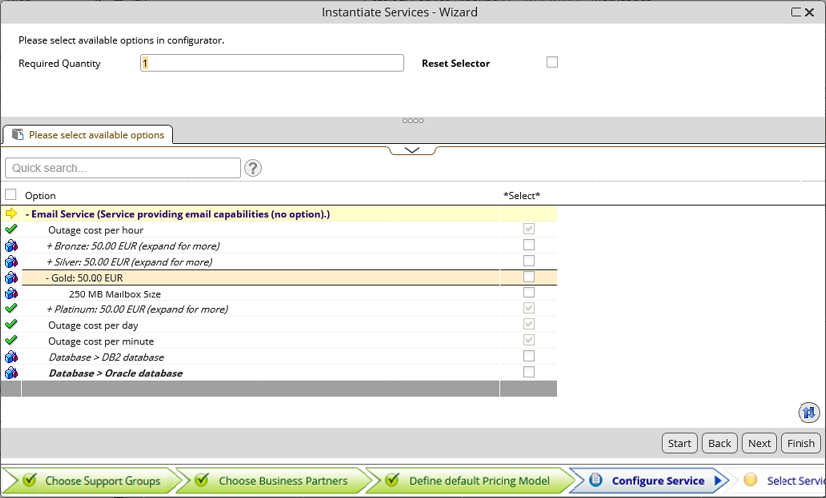
Click 'Next' to proceed to the next step of the wizard - selection of service offers.
- Step 5: Service Offers Selection
Select which offers belonging to the instantiated service will be offered to the end user.
- In the upper section of the wizard window, select or create the offer package under which the service will be offered.
- Go to the 'Please select available offers' section, select one or more offers and specify their quantity.
Offers assigned to the service template as a default offer are listed for selection in this step. If there is no such offer in the template, then this step is not included in the wizard.
- Step 6: Service Level Agreement
In the last step, select a Service Level Agreement, its assignment interval and validity interval for the service instances. An SLA assigned to the template as default is preselected in this step. It can be removed if necessary.
Click 'Finish'. The instantiated service is displayed in the 'Instantiated Services' catalog.
Actions in the 'Instantiated Services' catalog
The catalog provides two additional service agreement related actions:
- Choose Service Agreement - A service agreement is assigned to the linking object between service and business partner. If more business partners exist for the service, the service agreement is assigned to all of them.
- Print Service Agreement - The service agreement assigned to the selected service instance gets printed. The action calls the 'Print Report' print option.
- If no service agreement is assigned, a message urging the user to assign a service agreement prior to the print action gets displayed.
- Upon printing the service agreement, a possibility to attach it to the instantiated service-business partner link is offered.