|
|
|
|
|
Workspace
In the Workspace, you can design your workflow using the tools provided by the WCT in the Tool bar, Main bar, and the context-sensitive menu (see below).
Context sensitive menu
A context-sensitive menu is activated by the right-hand mouse button click on the workspace area. It contains functions which are available within the Tool Bar and some settings from those available within the Main Bar.
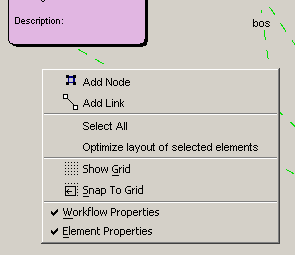
Context menu (right mouse click) on the WCT workspace
Menu Item |
Function / Meaning |
It is used to create a new node. When activated (in the Options menu in the Main Bar), the Add Node Wizard is stared, otherwise a common dialog is opened. (See Adding Nodes for more information.) |
|
It is used to create a link (transition) between two nodes. When activated (in the Options menu in the Main Bar), the Add Transition Wizard is stared, otherwise a common dialog is opened. (See Adding Transition for more information.) |
|
Select All |
Selects all elements (nodes and transitions) within the workflow. |
Optimize layout of selected elements |
Attempts to improve the layout by reducing crossing transitions. |
Show Grid |
Displays a grid to facilitate alignment of nodes. |
Snap To Grid |
Automatically aligns nodes to points in the grid. |
Indicates that the Workflow Properties area should be displayed in the Workflow Creation Tool. |
|
Indicates that the Element Properties area should be displayed in the Workflow Creation Tool. |
The WCT Workspace uses the following Graphical elements:
Node containing an activity
It is displayed as a rectangular shape with the name of the node displayed in bold type at the top. The name of the activity contained in the node is also listed together with any description.
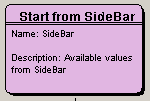
A workflow Node containing an activity
Condition
A lozenge shape indicates a condition (in this case a decision to be made by the user).
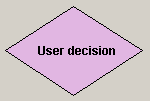
A condition which can cause a branch in the workflow
Start of Subworkflow
A large black dot denotes the beginning of a subworkflow. The Start Node is the input for parameters (values) from the calling Workflow into the subworkflow.
![]()
Start of a Subworkflow
End of Subworkflow
A smaller black dot surrounded by a black circle denotes the end of a subworkflow. The End Node provides the transfer back from the sub Workflow to the calling workflow.
![]()
End of a subworkflow
Transition
A transition between two nodes is represented by an oriented line which is either solid (when the 'Keep current transaction' flag is active) or dashed. See Transactions for more information.
The line representing a transition can be black, green, or blue depending on the Transition Type.
An arrow at one end of the line symbolizes the direction of the transition. On runtime of the workflow instance, the arrow can be white, yellow, or green depending on the state of the transition instance.
The output parameter of the source node and the input parameter of the target node are displayed on the line.
![]()
A transition