|
|
|
|
|
Sending an Email
The following steps describe a basic use case of sending an email based on a template.
Open a catalog, locate the object for which you need to send an email and use the right-click context menu to call action 'Send Email'. For example, open the 'All Tickets' catalog, look up a ticket of a particular ticket number and call the 'Send Email' context menu action.)
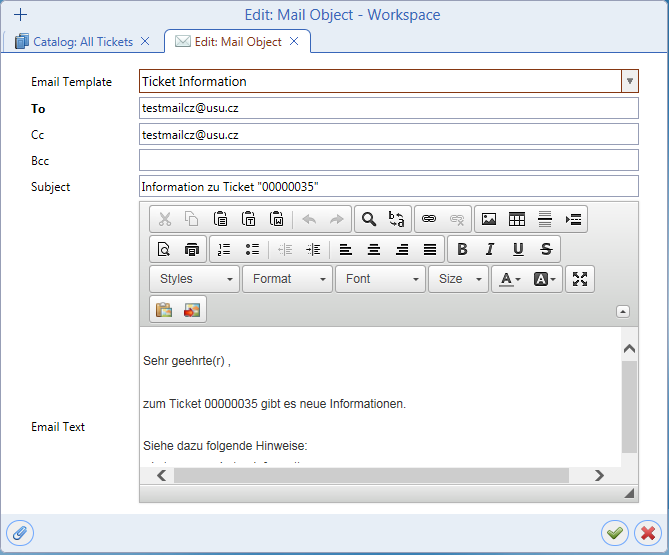
- The 'Edit: Mail Object' editor opens. The 'Email Template' field specifies the template on which the currently edited mail object is based. By default, the mail object is based on the template specified as 'Default for Object Type'. (This selection is made on the 'Object Type' tab of the email template editor.) Another template can be selected instead of the default one, the change is then reflected in the remaining mail object fields.
- Edit individual fields of the mail object. The fields have been pre-filled on the basis of used email template but their values can be changed. Note that these changes do not in any way affect the underlying template.
You can also add attachments to the email using the 'Show attachments' and 'Add attachments from object' buttons, see the editor description below for more information.
- Click 'OK' to send the email. The email is either sent directly or handed over to email dispatch using escalation.
Fields and controls available in the email editor
- Email Template
The template used for email creation. The template specified as 'Default for Object Type' (on the 'Object Type' tab of the email template editor) is pre-selected. Another email template can be selected here.
- To / Cc / Bcc
The addressee options: to / carbon copy / blind carbon copy. Values specified in the used email template are pre-filled but can be changed.
- Subject
Text used in the 'Subject' field of the email. The default text is taken from the template and can be changed.
- Email Text
Rich Text Control displaying a preview of the email body.
If the used email template (or rather the email body, to be precise) is based on a report, then the rich text control displays fully formatted email text as it is defined in the report. The text and its formatting can be edited using the rich text editor controls.
If the used email template is not based on a report, then the rich text control displays plain text as specified in the used email body.
Please note that Valuemation Rich Client currently does not support rich text editor. Rich client preview of email based on a report displays email text in a standard plain text control and the text can not be edited.If an email template is formatted as text/html ('Email Type' attribute on 'Email Template' tab) but its body is not based on a report, then text formatting can only be done by using standard html tags in the standard plain text control of the email body editor.
- Attachments button
Opens the standard 'Attachments' dialog for managing attachments of the actual mail object. Here attachments of the mail object are listed and can be added, removed, saved and opened. See also 'Automatic Sending of Object Attachments With Emails'.
- OK, Cancel
Click 'OK' to send the previewed mail object, click 'Cancel' to leave the mail object editor without sending any email.