|
|
|
|
|
Create a Complex Report With Parameters
In this example, we will:
- Use fixed Text and Image report items to create a report header
- Use a global parameter to fill the header with the current date
- Use floating Text and Table report items and parameters to display detail information on a particular object including a collection of objects of another object type linked to it.
The reader is asked to kindly accept the use of screenshots with English content in this topic.
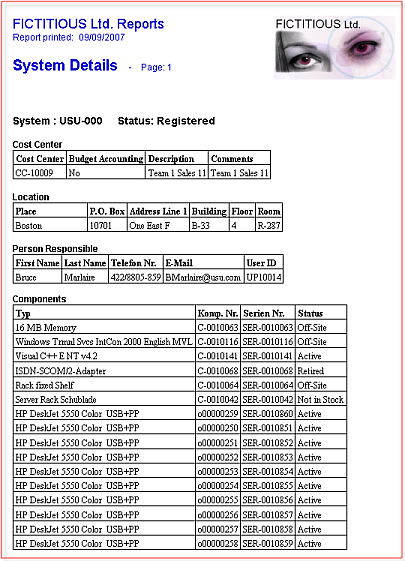
Our goal will be to obtain a report providing information on a selected system including a list of all its components. The resulting report should look like this:
Let's get started:
- Open a 'Reports' catalog from Valuemation Core sidebar.
- Create a new report using the 'Create' command. The report editor opens.
- In the 'Report Info' tab of the editor, give the new report a meaningful name.
- We want the report to display a particular system so it is a system we will be choosing as the main parameter.
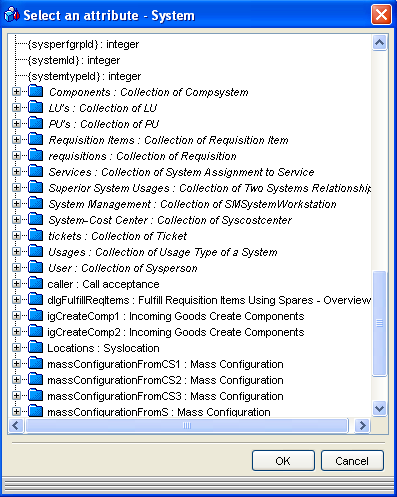
Switch to the 'Parameters' tab and press the 'Add Parameter' icon. In the 'Select Object Type' dialog which opens, choose 'System' and press 'OK'. Give the parameter a meaningful name.
- Now it is time to decide what information about the selected system we want to have displayed - we will be selecting so called Derived Parameters. Click the 'Add Derived Parameters' button. The following dialog opens:
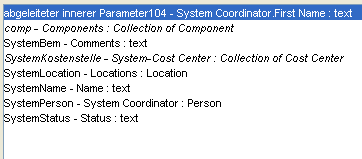
In order to obtain the information seen in the report screen capture above step1, we will need to use the 'Select an attribute' dialog several times until we get the following selection of parameters:
- At this point we are done selecting parameters. Let's switch to the 'Report Items' tab and start creating the report layout.
First, we will insert several fixed report items to create the report header. With the 'Report Items' tab selected, press the 'Toggle fixed/floating report items' button in the main editor toolbar until it looks like this:

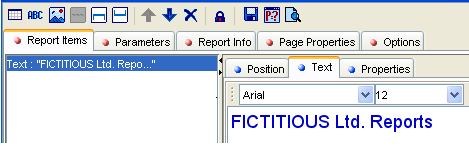
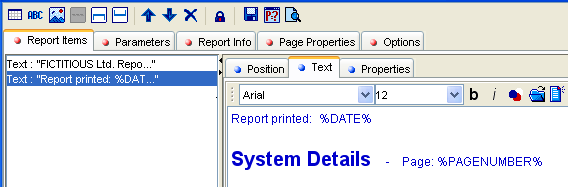
The first fixed report item will be the company name. We will add it to the report header by inserting a fixed text report item like this:
- Next, we will insert information about the date when the report was printed, the report name and the page number. We can do this in one pass, i.e. in one text report item. Note that for the print date and page number we have used global parameters as explained in 'Creating a Report: Syntax Rules for Parameters'. An empty line has been inserted to create the space between the two lines. To give the words 'System Details' (e.i. the name of the report) a larger font, select the words and apply formatting in the toolbar.
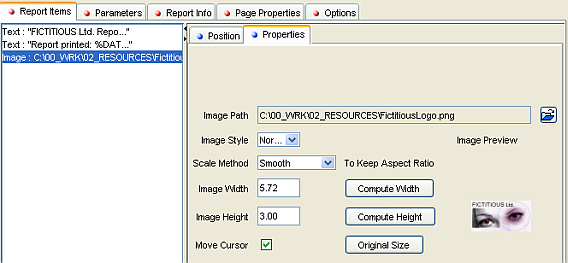
- The last item in the header is the company logo. We will add it by inserting a fixed Image report item and playing with its position on the page.
Having selected a suitable image file, we use the 'Add Image' button to insert the report item. Ideal settings for our image look like this:
Let's get creative positioning the image now. The image in our example report is positioned using the following settings:
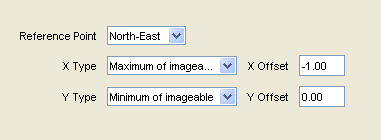
These settings say: take the upper right-hand corner of the image (Reference Point: North-East) and put it to the upper right-hand corner of the printable part of the report (Maximum of imageable on the X axis plus Minimum of imageable on the Y axis). Shift the image 1 cm to the left (X Offset: -1, units of measurement are set on the 'Options' tab)
We are done creating the header.
- Toggle the 'Toggle fixed/floating report items' button in the main editor toolbar so that it looks like this:
 . We will be adding floating report items displaying the actual report information.
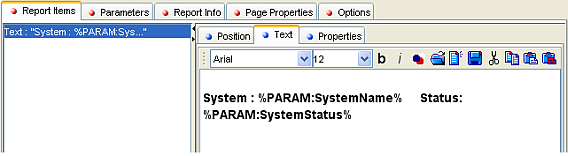
The first item will be the name of the system displayed in the report and its status. This information will be displayed as parameter-driven text entries. Press the 'Add Text' button in the main report toolbar and edit the inserted text report item (See 'Creating a Report: Syntax Rules for Parameters' for more information on parameters.) so that it looks like this:
- The next report items will follow a pattern of text item (name of table) plus table item (actual information about the referenced object). Let's start with the systems 'Cost Center'.
First, insert a text report item saying simply "Cost Center". In our example, we will insert an empty line as part of this text item in order to set it off from the previous one.
Next, let's insert a table based on the 'Cost Center' object type.
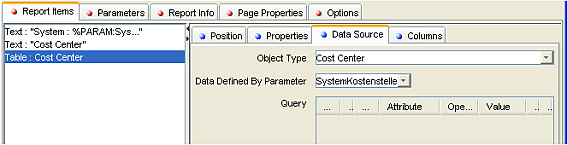
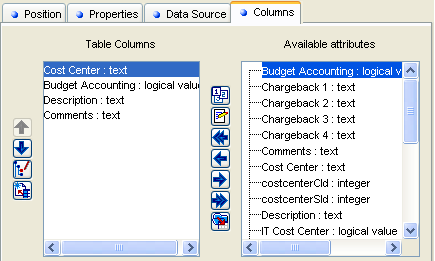
On the 'Columns' tab, let's define the columns to be displayed with the Cost Center.
In the Report Preview, the result of this step should look like this:

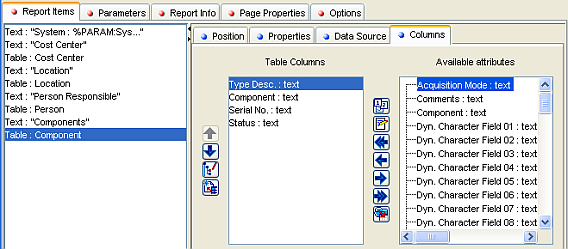
- In a way analogical to step 10, we will insert one text and one table report item for each of the remaining system attributes displayed in the report. Namely: 'Location', 'System Coordinator' ('Person' object type) and 'Components'.
The settings on the 'Position' and 'Properties' subtabs will be left at their default values. These can be further fine-tuned at a later stage.
To preview the resulting report, use the 'Print Preview' function. You will be able to print the report from the 'Print Preview' window. After the report is saved, it will also be offered by the 'Print With' function called from any catalog of systems.