|
|
|
|
|
Creating a New Object Type together with a Table
The procedure of creating a new Object Type together with a database table consists of the following steps:
- In the Customization Browser, click 'Create New'.
The 'Create New Object Type' dialog box appears.
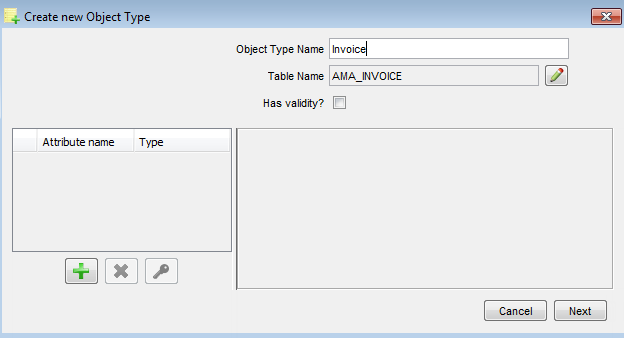
The dialog box consists of the following parts:
- Object Type Name - Type a name of the new Object Type.
- Table Name - The table name is generated automatically out of the Object Type name. Click the Edit button to rename it if necessary.
- Has Validity? - If selected, the Object Type will have an option of the validity period assigned (the valid from - valid to interval).
- The left part of the dialog box enables you to add individual attributes of the new database table. You cannot proceed without at least one attribute created in the table.
- Use the '+' button to define some attributes for the Object Type.
- The 'x' button deleted the selected attribute from the list.
- The key button enables you to mark the selected attribute as a primary key.
Note: The table must have a primary key.
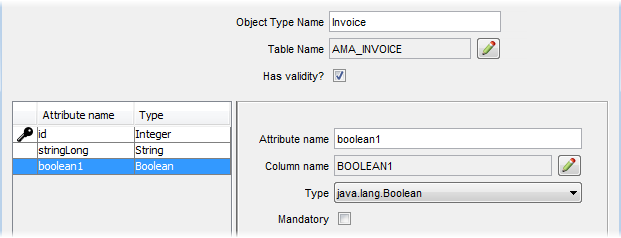
On the right, you can define parameters of each attribute:
- Attribute Name - The name of the attribute.
- Column Name - The name of the database column. Again, the name is generated automatically out of the Attribute name. Click the Edit button to rename it if necessary.
- Type - Select the desired attribute type.
- Mandatory - If selected, the attribute becomes mandatory. This means that the column cannot stay empty in the database. Note that making the attribute mandatory at this level takes precedence over mandatory settings in other Valuemation customizers.
- Click 'Next' to proceed.
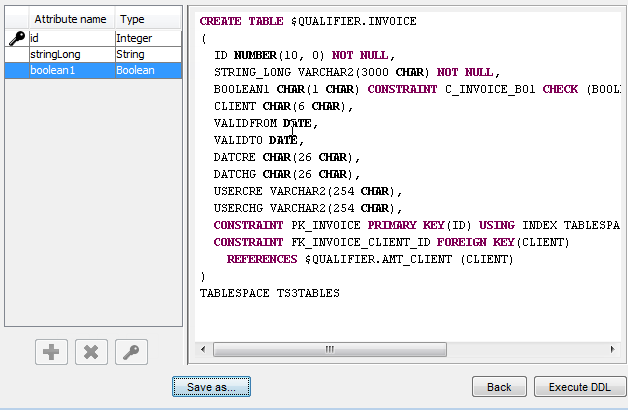
Now you can see a generated script which enables you to make a quick summary of the previous settings and definitions.
Below you can perform the following actions:
- Save As... - Allows you to save the generated script as a *.ddl file.
Note: If you are connected to a specific database in an external environment, the *.ddl file just for the corresponding DB platform will be created. If you are connected to an internal "USU Software" database, the *.ddl file will be generated in three versions for all three supported DB platforms (Oracle, MS SQL, DB2).
- Back - Goes back to the previous screen and allows you to make some changes if required.
- Execute DDL - Executes the script.
- Save As... - Allows you to save the generated script as a *.ddl file.
- Click 'Execute DDL' to proceed.
Now the system creates the specified Object Type and the table in the database (which the Object Type is mapped to).
Note: The dialog box stays open so that you can use the 'Back' button to quickly create another Object Type-Table.
The new Object Type will be listed in the Object Type Browser. You can double-click to open it in the Object Type Customizer and edit the Object Type in the usual way.