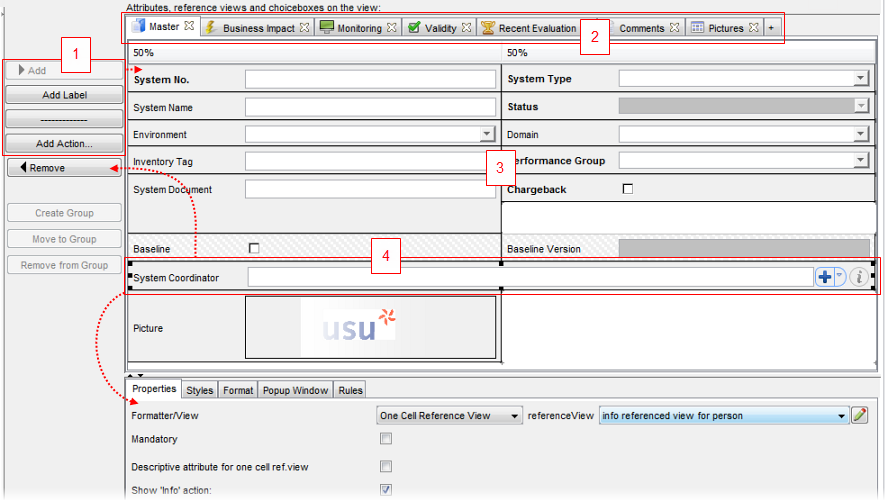
The View Designer provides the actual means to create and customize the layout of a view. Not only it allows you to see the look of the view which is very similar to the end result during the creation process but it also implies the ability to directly manipulate the layout of the view.
Changes in the layout of the view are primarily controlled with the drag & drop functionality. This gives you a freedom to modify the layout in any way: All view elements can be easily positioned, moved and resized in the view. Besides, the View Designer enables you to have an instant visibility of your actions and their results.

The appearance of the view in the View Designer is governed by the following elements and rules:
- (1) The control buttons enable you to move attributes between the Attribute resource section and the View Designer. You can also add more elements such as a label, separator and an action in the same manner.
- (2) The view can be structured by tabs. Each tab represents a separate group of view elements. The selected attribute from the Attribute resource section or the other view elements will be added to the currently selected tab.
For details, see the Tabs topic.
- (3) The View Designer desktop is made up of a virtual grid where each view element represents an individual tile. This enables you to place all view elements at precise positions on the view.
If you add a new attribute, it will be aligned with the nearest grid line at the bottom of the view. Then you can click and drag the attribute element into another place within the desktop. However, you can only drop it into an empty space you might have prepared before.
For details, see the Designing a View chapter.
- (4) If you select an individual view element in the desktop, you can find a set of its properties below. Changes in the properties are displayed in the View Designer in real time.
When selected, the element's positioning points becomes visible and you can be resize the whole tile by dragging the highlighted positioning points and borders. Note that when you click and drag an element tile's positioning handles to resize it, the element is resized in grid increments only.
The selected element can be removed using the 'Del' key or the 'Remove' button.
For more details, please see also the Designing a View section.