|
|
|
|
|
Valuemation Data Export
For use in the report designer, relevant data must be exported from Valuemation.
- In Valuemation Rich Client, open a catalog containing the data to be exported.
- In the catalog, select the objects to be exported and call action 'Export of Objects' from the right-click context menu. (If not present in the menu, the action must be added.)
- The 'Exporter' window opens.
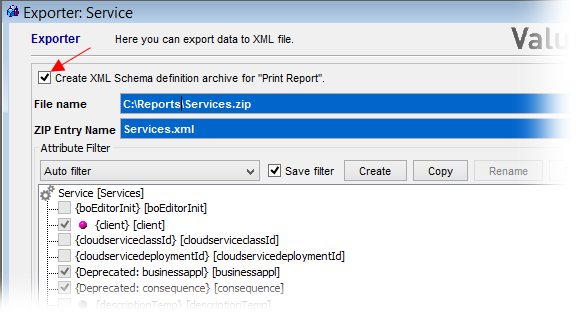
Use the 'Exporter' window to set up the data export.
- Make sure that the 'Create XML Schema definition for 'Print Report' check box is selected.
- 'ZIP Entry Name' is automatically filled in with object type name + xml extension. Do not change it!
- 'File name' is the name of the zip file which will be used as data source for the report designer. The field also gets automatically pre-filled and the automatic name can be changed at will.
- 'Attribute Filter' specifies the range of data to be exported.
If a BIRT filter for the object type already exists, it can also be used for Valuemation Analytics reporting (by selecting it in the 'Attribute Filter' drop-down).
If no suitable filter exists, it needs to be created. See 'Attribute Filter Creation' below.
Note: the word 'Birt' refers to a previously used option for Valuemation reporting. The current versions use generic 'report filter' applicable for both Birt reports (if still used) and VMA reporting.
- Click the 'Export' button to create a ZIP file containing the exported data. The file will be named as specified in the 'File Name' field of the 'Exporter'. The ZIP file will contain the XML file specified in the 'ZIP Entry Name' field.
The resulting ZIP file will be needed to import the report to Valuemation.
Attribute Filter Creation
A new attribute filter can be created in the following way:
- Select a starting point for filter creation. The most common starting point for filter creation is the selection of filter 'Only top-level attributes'. This filter provides selection of data best suited for report creation.
- Select the initial filter and click 'Copy' to create a new filter instance.
- In the filter tree, select relevant attributes and relations.
- Click 'Rename', name the new filter in the dialog which opens and click 'Ok'.
- Make sure the 'Save filter' check box is selected.