|
|
|
|
|
MultiLine Catalog Customization
As one of catalog modes, the Multiline mode is customized in the Catalog Customizer. See the 'MultiLine Designer Tab' topic for a straightforward description of the tab devoted to Multiline layout customization.
Individual Multilines can be seen as small views displayed one after another in a catalog. Hence the similarity between the MultiLine Designer and View Customizer.
Creation and customization of the Multiline layout involves the following steps:
- In the Catalog Customizer, open the catalog whose Multiline mode is to be created/customized. Navigate to the MultiLine Designer tab.
- Plan the desired layout (in your imagination, on paper, or otherwise) in terms of row and column numbers and attributes to be displayed.
- In the MultiLine Designer, use the 'Grid columns' and 'Grid rows' fields to set the MultiLine grid.
- Proceed by adding cells to the layout. In the Object Type Attributes pane of the designer, double-click the attribute to be displayed in the layout. A cell linked to this attribute will be added to the first empty location (left-right / up-down) in the layout. Alternatively, you could select the attribute in the list and click the 'Add Cell' button. Remember to specify the field's content type. For the attribute value to be displayed, the cells content type has to be 'Value'.
Note: Once you set Content Type as 'Text', no other content type can be selected. In case of accidental setting the type to 'text', delete and re-insert the cell.
- Special steps may be necessary to add an image, see description below.
- Arrange the size and position of the cells within the Multiline grid. This can be done by dragging cells and cell borders. Both entire cells and cell borders snap to grid automatically.
- Format the cells: Select a cell in the Layout Pane and use the Cell Properties pane to give the cell the desired look.
The biggest font size used in the cells of one row determines the height of the row.
Cells of the 'Text' and 'Value' content type provide the 'Multiline' property. If this is set to true, then the text in the cell is line-wrapped. The cell's height (and most like the height of the entire row) is then determined by the amount of text in the cell.
- Having saved the changes and tested the result, it may be necessary to go back to the Multiline Designer and fine-tune precise column widths to best fit the displayed data. See 'Arranging precise column widths' below.
See also 'Example: Creating a Multiline View' for a practical example.
Arranging column widths precisely
When the cell grid is created (by specifying the 'Grid columns' and 'Grid rows' values), columns of equal widths are created, i.e. the available total width is split evenly between existing columns.
It is possible to modify this even division in the following ways:
- A: drag the divider lines, or
- B: double-click with the right mouse button in the column header and edit the width value numerically
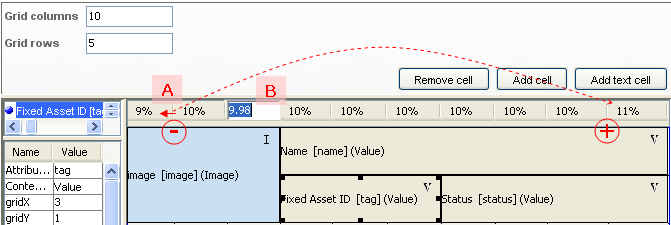
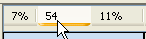
The column width can be expressed as percentage (total catalog width being 100%) or in absolute numbers (in pixels). To switch between percentage and width in pixels, double-click with the left mouse button in the column header.
Enabling / disabling catalog modes
For each catalog it is possible to determine which view modes will be available, thus limiting the user's selection only to catalog modes which are relevant or suitable for a given use. You might, for instance, create a special 'MultiLine-only' catalog with fine-tuned, user-friendly Multiline mode and all other catalog modes disabled.
Enabling/disabling catalog modes is done on the General tab of Catalog Customizer:

Inserting Images
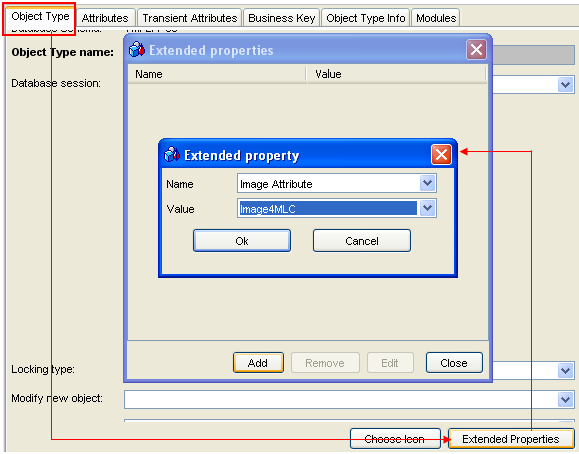
In order to display an image in the MultiLine mode, the object type attribute linked to the Multiline cell has to be an image attribute. See also the 'Image Assignment' section.
Note that it is possible to specify more than one image attribute for one object type (thus making it possible to display more than one image in one Multiline). Which of the multiple image attributes is the 'main' attribute (sometimes referred to as 'BOType image attribute') is determined by the 'Extended Properties' setting on the 'Object Type' tab of the Object Type customizer.