|
|
|
|
|
Assign Images to Specific Objects
Task: Assign a specific image for each component type class. This way the component class Keyboard will be displayed as a keyboard, LCD monitor will be an LCD etc.
As a prerequisite, usable images have to be added to Valuemation resources. See Adding an Image for more information.
To assign specific images to specific objects, we have to:
- Define an attribute which represents identification of the image.
- Add this attribute to the object type's editor.
- Fill each object's attribute with an appropriate value representing the image.
Define the Attribute
You can choose an already used string attribute of the object type (attribute Shorttext in Component Class in our example) or define a new one.
To do so, proceed as follows:
- Go to the Object Type Customizer, locate the object type and go to the Attributes tab of the object type editor.
- Add an attribute from the Available Columns section or locate a suitable used attributes of the string type.
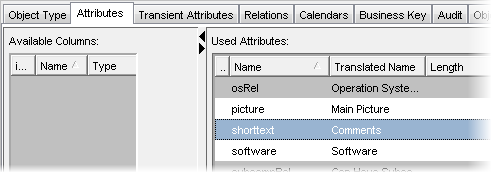
Component Class in the Object Type customizer. No available columns, let's choose a used string attribute, e.g. shorttext (otherwise we would have to add a column to the database table). - Go to the Object Type tab and clickthe Extended Properties button.
A dialog box opens.
- Use the 'Add' button to add another property and select Image Attribute as name and set the value to 'TRUE'.
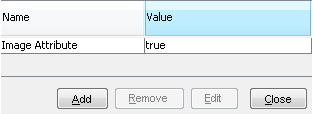
Specifying an Image Attribute in Extended Properties
Add the attribute to the editor
If it is not there yet, you should add the attribute to the object type editor (so that we will be able to specify the attribute values for individual objects). This is done in the View Customizer. Note that if you have chosen an already used attribute, its field may already be present in the editor. Then you can skip this step.
Specify the images to be used with individual objects
When the above has been completed, it is possible to specify individual images for individual objects.
To do so, proceed as follows:
- Open the object in the editor and locate the field which is linked to the attribute selected as Image Attribute. In our example, we used Shorttext as the Image Attribute and the field linked to the shorttext attribute is labeled Comment.
- Identify the image to be used with this object.
- Use the name of the image specified under 'key' in the Translations of Application Text catalog in the Valuemation Core manager (filter it using 'Base Name=icons/images'.
- Use the image name to fill the Image Attribute field.
Use the following expression:
GLOBAL: ImageName
where ImageName is the actual name of the image. The entry is not allowed to have spaces and is Cap sensitive.
Now we would like to have some of the Component Type Classes displayed with an image. We have already prepared suitable images and put them in the correct location within Valuemation resources (see Adding an Image). We have also customized the Component Type Class object type to accommodate the image attribute (see this topic, above). All there is left to do is assign the images.
To do so, proceed as follows:
- Open the Translations of Application Text catalog in the Valuemation Core manager.
- Select the Base Name icons/images and hit the Search button to see what images are available and what their names are. By opening the entries in the Editor you can change the image paths.
- By right-clicking on any entry and selecting Create a new entry can be created.
One by one, let's assign the images.
- In Valuemation, open the editor for the 'mouse' component type class and fill its Comment field in the following way:
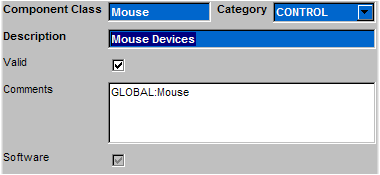
Upon saving the changes, the mouse node changes into the image identified in the image.properties file as 'Mouse'.
- Proceed analogically for the remaining component type classes.