|
|
|
|
|
Multitenancy Definition
When defining Multitenancy, first you must decide:
- Which Object Types you want to use it for (System - Component in this example).
- Which Users/Groups you want to apply it to.
Multitenancy Usage - Initial Configuration (by example)
- Imagine there is a Component Object Type in the Object Type Customizer.
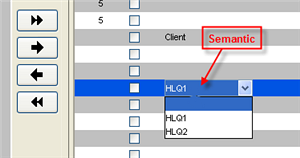
The attributes are of Integer type (foreign key to another table), which means it is possible to select a semantic for Multitenancy here (HLQ1, HLQ2).
This selection is done in the Object Type Customizer by clicking directly in the row.
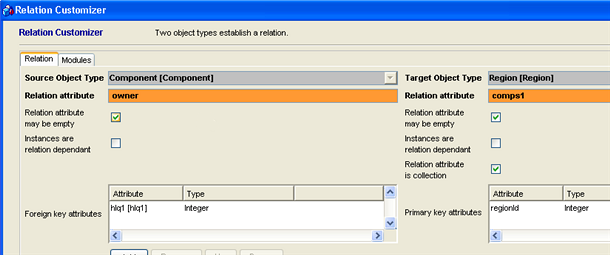
- Next a common relation to the HLQ attributes in the Relation Customizer (to a "Region" target Object Type which has just been created, too) will be defined.
Note the Region referenced via the HLQ1 attribute (later the Region type will determine how the user will be able to work with the Component):
 ´
´
- Multitenancy Attribute Assignment
As a next step, we will define the permitted Regions for a User.
Open the User Manager and select the required User. Note that we have marked "du du" (as a sample default user).
Note: It is not necessary to set the allowed Multitenancy Datasets user by user only - you can do the same settings for the Groups too in the User Manager.
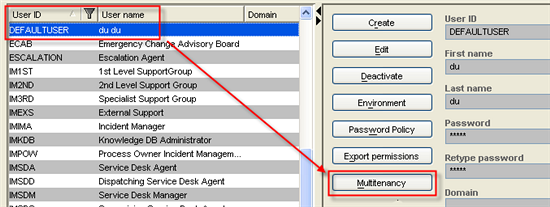
Click the Multitenancy button to open the Multitenancy Datasets catalog. In our example, a new data set will be an object containing all possible Regions (Target Objects) which can be used for the relation:
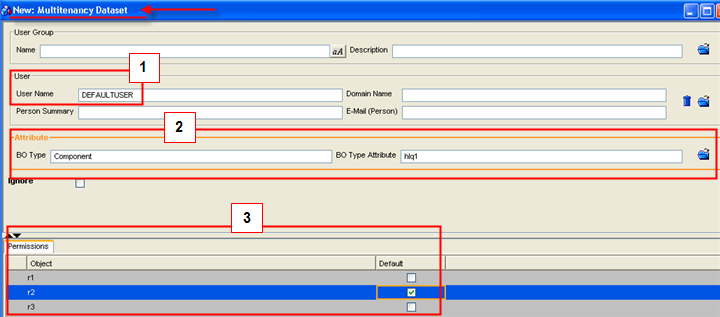
Search for and select the default user (1) and select from attributes which have the Multitenancy semantic defined - in our case we will select the Component Object Type with HLQ1 attribute (2). Next create permitted Regions (3) for the HLQ1 attribute (which already has the "owner" relation type) using the Create Permission button at the bottom of the dialog box (not shown in the pic above).
You can see that the r1, r2 and r3 regions were permitted in our example; r2 was marked as default (the default region setting would be useful for a new component creation: when created, the default regions would be set there automatically).
Now we will make the similar setting for the Component - HLQ2 relation. Lets permit r1 - r4 Regions with r3 marked as default. Since the r5 region wasn´t set, the possible component with r5 region won´t be availabe to the user.
Here is the result of the datasets definition:

- Importance of the Relations from the Authorization Point of View
Now open the Authorization Manager, go to "Permission to Object Types" tab and select the Component Object Type.
In the "Variable by Dataset" combo box select the HLQ1 (HLQ2) attributes and set the required rights for them. For instance, we will select the "Delete" right for HLQ1 (since that is the owner) and the "Write" right to the HLQ2.
Here is the result of the settings:
