|
|
|
|
|
Roles
On the Roles tab, you can create, edit and delete Roles. A role is a profile that describes a certain category of users and describes the tasks which they carry out within Valuemation. Authorizations are then granted to roles and not to Users. For additional information about Roles, please see the Role Mapping topic in the Basic Concepts chapter.
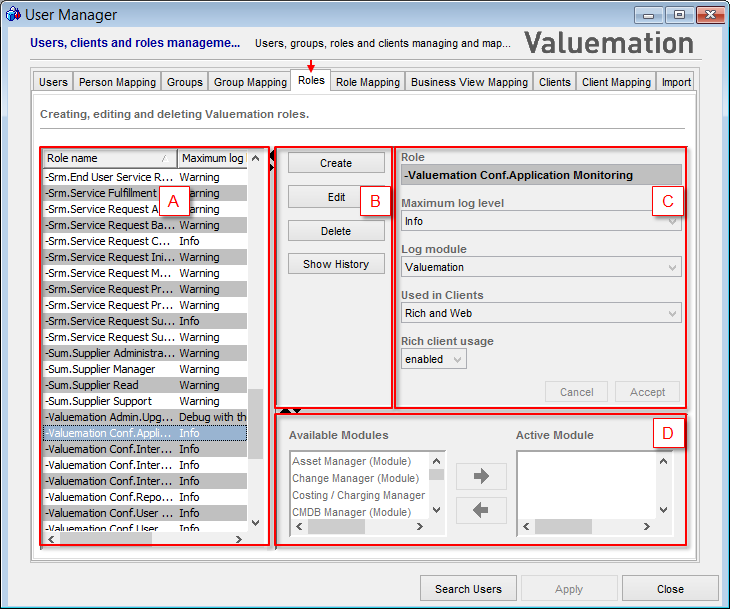
The Roles window.
The Roles window is divided into four main elements:
- Table of Roles (A)
- Main Controls (B)
- Role Properties for an individual role (C)
Table of Roles
The Table of Roles contains a list of all roles existing in the system. It provides information about their names and log level parameters.
Columns in the table of roles are:
- Role name
A name of the role (e.g. Administrator).
- Maximum log level
Valuemation Log messages are logged at different severity log levels. Maximum log level setting disables displaying all messages with lower severity log level to the users within the specified role in the Log-Viewer.
This setting does not have any effect on what Valuemation actually writes to the log, which is determined through Logging Settings.
- Log module
Log module setting disables displaying all messages logged by any other than the chosen Log Module to the users within the specified role in the Log-Viewer.
This setting does not have any effect on what Valuemation actually writes to the log, which is determined through Logging Settings.
Role Properties
The properties of the role which is selected in the Table of Roles are displayed (in read only mode) in the Role Properties section.
Role properties section consists of the same three fields as are the columns in the Table of Roles:
- Role name
A name of the role (e.g. Administrator). Mandatory.
NOTE: The name of a new role must be different from the names of existing roles.
- Maximum log level
Valuemation Log messages are logged at different severity log levels. Maximum log level setting disables displaying all messages with lower severity log level to the users within the specified role in the Log-Viewer.
This setting does not have any effect on what Valuemation actually writes to the log, which is determined through Logging Settings.
- Log module
Log module setting disables displaying all messages logged by other than the chosen Log Module to the users within the specified role in the Log-Viewer.
From this combo-box, you can select either one of the modules or the item All which enables the user to view log messages logged by all log modules or None which disables the user to view any log messages.
This setting does not have any effect on what Valuemation actually writes to the log, which is determined through Logging Settings.
- Used in Clients
This setting defines in which client context a role can be used.
- Rich and Web (default)
- Role for rich and web client
- Usually basic permissions, which are supplemented by 'authorization with customization', e.g. Catalog conditions.
- Web Service
- Role only considered during Service API access
- Restrictive permissions, which often use 'User Variables'
- All Clients
- Role for rich, web and Service API access
- Permissions are sufficient for all clients
- Rich and Web (default)
- Rich Client Usage
It is possible to restrict access to the rich client for a particular role. This way the specified user or role can work with Valuemation web client but has no access to the rich client.
- Enabled - the selected role has access to the rich client
- Disabled - the selected role does not have access to the rich client
Note that access to the rich client can also be restricted on the user basis - see topic 'User Properties' for more information.
The Cancel and Accept controls are available to discard or save the changes made in the Role Properties when creating a new role or editing an existing one.
Main Controls
The following Main Controls are available for roles:
- Create
Clears the Role Properties fields and activates Edit Mode, so that information about a new role can be entered. Creates a new role.
- Edit
Activates the fields of the Role Properties to Edit Mode for the selected role, so that they can be changed. You can change the name of the role and its log parameters. The button is disabled when no role or more than one role is selected.
- Delete
Deletes the selected role.
- Show History
Opens a catalog with all history modifications for all or selected roles.
NOTE: For every new role, a Default Authorization is automatically created (the authorizations are managed in the Authorization Manager).
Assignment to Modules
Assignment to Modules section enables you to assign selected role to the Active Modules (i.e. selected modules) chosen from the Available Modules. This feature serves for Metamodel Export only (see Export Metamodel and corresponding topics).