|
|
|
|
|
Script Guidance Area
The Script writing guidance area contains the following elements:
- Outline (tab)
Shows inner functions and inner classes in the script. Select a function/class in the list and the cursor will be positioned in the first line of the function.
- Input (tab)
List of input variables (passed along input transitions to the script node). Double click on the selected input variable to insert it into the script.
The Input tab is also able to show the return class of the input variable (if ). The Code Complete pop-up window shows all possible API classes after ':'.
This gimmick is useful when specifying the return class in a comment – e.g. #%varName:className. Being able to select one of the API classes from a combo box directly in the script area increases the productivity.
- Output (tab)
A list of output variables (passed along output transitions to the script node).
Double click the selected output variable to insert it into the script.
- Templates (tab)
List of templates. In this tab you can add, edit or remove templates. Double-click the selected template to insert it into the script.
- History (tab)
Shows the version list of the current script and the authors of the changes. This feature can be enable or disabled in Global Settings > Application Monitoring with the 'Keep Script History' check box.
If selected, the script will not be overwritten but the old version will be kept after modifying the workflow script (in the Script Editor or by importing a file). You can see the script history here in the Script Editor on the History tab. Not only you can see the older versions of the script but you can also open them in read-only mode and compare them in an external compare tool. When editing script tasks (BPM), the History tab shows all script task from all process versions.
See also the 'Versioning of the Scripts' topic for details.
- Object Types (combo box with history)
Select an object type from the combo box (you can type the beginning of its name for faster navigation) and then use one of the three buttons.
Add Object Type: inserts the name of the current object type into the script.
Add Attribute: Inserts an attribute (which you select in the Attribute Tree dialog ) of the current object type into the script. Moreover, when you select a part of the text representing an attribute of the current object type and press 'Add Attribute', the attribute will be preselected in the Attribute Tree dialog and if new one is selected, it will replace the selected text.
The 'Add Attribute' dialog box has also a "Add Valueset Value" button (visible when you select a attribute which has a valueset) attached:
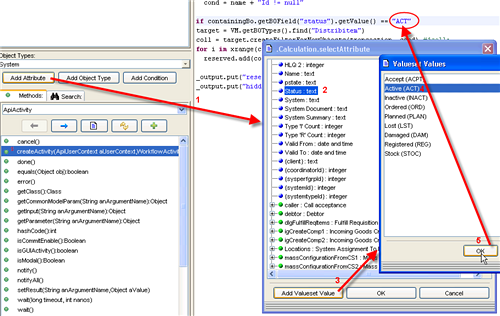
After clicking it, a dialog listing all valueset values (translated and untranslated) opens. Then you can select one or more valueset values and finally click on OK -> the value(s) will be inserted into the script. This brings safety and more productivity to a customizer.
Add Condition: inserts a condition (which you enter in the Query Editor) of the current object type into the script. Moreover, when you select a part of the text representing a valid query for the current object type and press 'Add Condition', the condition will appear in the Query Editor and after it is edited it will replace the selected text
- Classes (tab)
Select an API class and all its public methods and constants (shown at the end) will be displayed in the list bellow (on the Methods tab). Search the desired method using the arrow keys or typing the beginning of the name. When you double click on a method or a constant (or press Enter) it will be inserted into the script.
You can also see the Api documentation for the selected method in the browser by pressing <Ctrl+F1>. - Libraries (tab)
On this tab you can see a tree with Valuemation libraries (in the vm package) and standard libraries (in other packages). The Valuemation libraries have a pink book icon and the standard libraries have a blue book icon.
- Expand the library to see its classes and functions, double click on a class or function to insert it into the script.
- Select a library, class, method or function to see its documentation in the yellowish area under the splitter. Documentation is stored as a multiline string (enclosed in triple-quotes).
- Double-click on a class, method or function to insert it into the script. The corresponding import statements will be inserted too.
- Press F3 on a library, class, method or function to open the library and position the caret on the corresponding line. Note that standard libraries (stored on disk as *.py files) will be open in read only mode.
- Press F5 to refresh the library cache and tree (e.g. after adding a standard library to the lib directory).
Valuemation is distributed with standard Python 2.5 libraries located in directory:
- On the Rich client: <root>/Python/Lib
- On Web application: webapps/vmweb/WEB-INF/classes/Python/Lib
(note this library includes required urllib module).
To use another Python library it is enough to create another directory, e.g. "myLibXY", in the "Python" directory, with its modules and packages.
Script editor then displays:
- all workflow libraries under "vm" package
- all libraries from the Python directory
- libraries defined by system properties "python.home" and "python.path".
Note that Valuemation uses "python.home" and "python.path", but does not require them. These system properties can be undefined.
Python creates "*$py.class" files for used modules in the run-time.
Therefore Python libraries, both from the Python directory and workflow libraries, are copied (on the start) to the "vmcache" directory, which should have write permissions.
- Search (tab)
Here you can search for workflow scripts containing a certain search phrase.
The found scripts are shown in a list.
Please see also the 'Search in the Script Editor' topic.
- Options
- Insert attributes with quotes
When inserting an attribute from the attribute tree, the attribute will be enclosed in quotes.
- Insert argument names
When inserting a function or a method having arguments, argument names will be inserted.
- Offer Python accessor
When selected, the code complete pop up window will offer Python accessors for getters (methods starting with 'get' having no arguments) (e.g. getDisplayName() -> displayName).
- Automatically detect indentation style
When selected, the indentation style (tab or spaces) will be detected from text before/after the caret.
- Show indentation difference
When selected, the difference in indentation will be marked with an orange marker (spaces or tabs, depending on the 'Identation by tabs' setting).
- Show indentation lines
When selected, the indentation lines will be shown.
- Show breakpoints
When selected, a bar showing permanent breakpoints will be shown. You can toggle breakpoints by double-clicking on it.
- Add import
When inserting a function or a method, an import statement will be inserted if needed.
- Verify imports
When saving a script, import statements will be verified.
- Show full title
If selected, tabs will show a full title (workflow / script name).
- Select in Library Tree on Go to Declaration
If selected, the corresponding element in the Library Tree will be selected when the action Go to Declaration (F3) is requested.
- Go to Declaration on selection in Library Tree
If selected, the action Go to Declaration (F3) will be requested when an element in the Library Tree is selected and the module is open.
- Text Antialiasing
If selected, text rendering will be done with some form of antialiasing.
- Run documentation tests on save
When saving a script, documentation tests will be run.
- Automatic Style Guide Check
Perform a style guide check after opening the script and after each modification. Detected problems are indicated by a pink line at the left edge.
- Insert attributes with quotes