|
|
|
|
|
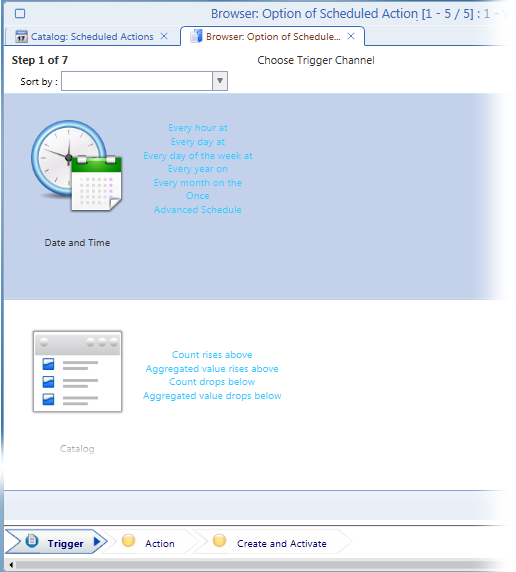
Step 1: Select a trigger channel
To generate a report every day, double-click the 'Date and Time' row in step 1 of the wizard.
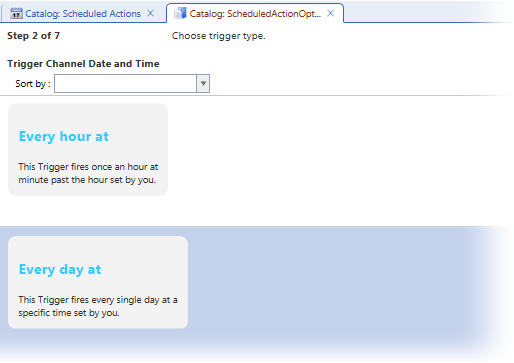
Step 2: Choose trigger type
Step 2 presents a list of triggers predefined for the trigger channel selected in step 1. In our example, various 'Date and time' triggers are offered. Double-click 'Every day at to proceed.
Step 3: Specify trigger parameter(s)
In step 3 you specify parameters of the trigger type selected in step 2. The type, number and complexity of the parameters depend on the trigger type. In our example, it is necessary to specify the time of day (hour-minute-second) when the trigger will go off.
Double-click the parameter line. Another editor window opens. Specify the parameter value(s) and click the 'Ok' button to return to the wizard.
Step 4: Choose action channel
In step 4 you select the category of action to be triggered. To continue in our example, double-click the 'PDF Report' line.
Step 5: Choose Action Type
Here you select the actual predefined action. Double-click the line with the action to proceed.
Note that if only one action exists for the selected action channel, then step 5 is skipped. This is the case in our example because only action 'Send PDF Report' is provided under the 'PDF Report' channel.
Step 6: Specify parameters for the selected action
Depending on the action selected in step 5, one or more parameters need to be specified in step 6. Double-click each parameter line and specify the value(s).
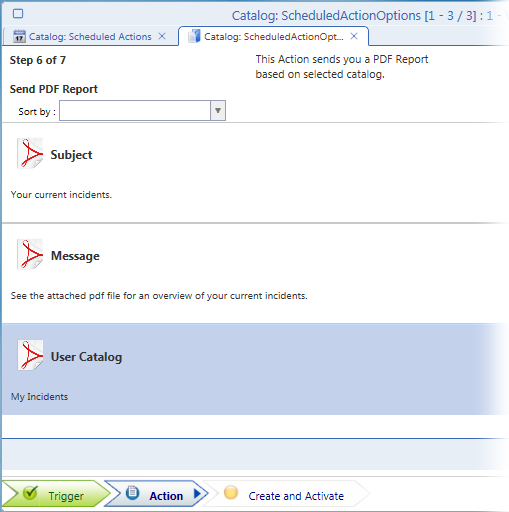
Double-click each listed parameter to open its editor.

As depicted above, the 'Send PDF Report' requires specification of email subject and message (the email by which the report will be sent) and the user catalog on which the report will be based. Note: The list of catalogs provided for selection is based on user-specific catalogs. Consequently, it offers only catalogs found in the sidebars of business views which you have at least once used. If you cannot find the catalog you need in the list, open and close the business view whose sidebar contains the required catalog. This will create a user version of the catalog and thus the catalog (together with other catalogs present in the business view sidebar) will appear in the list in step 6.
Step 7: Summarize and enable
The last step provides a summary of the scheduled action. It can also be used to name the action and enable or disable its automatic execution. Note that by default a new scheduled action is disabled.
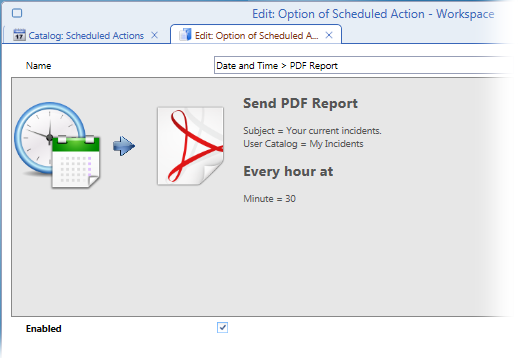
Click 'Ok' to finalize the wizard. The newly created scheduled action will be added to the 'Scheduled Actions' catalog.