|
|
|
|
|
Multilingual translation needs to be specifically enabled for each attribute which requires storing data in multiple languages. The process also involves creation or modification of the corresponding translation database table.
To enable multilingual support for one or more attributes of an object type, do the following:
- Open the object type in the object type customizer and switch to the 'Attributes' tab.
- Locate the attribute which requires multilingual support. Note that not all attributes can be translated (see 'Translatable Attributes' for more information). Attributes which can be translated contain a check box in the 'Translated' column of the 'Used Attributes' list.
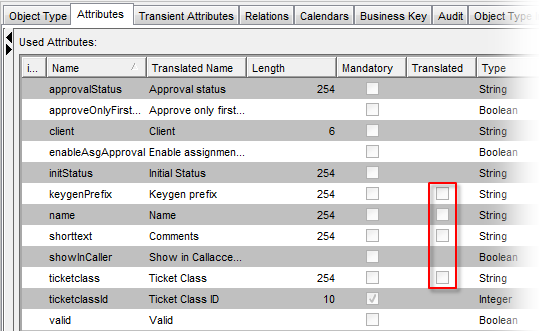
Translatable attributes in the Object Type Customizer (example: Ticket Class object type) - Check the 'Translated' check box for the selected attribute and click 'Apply' at the bottom of the Object Type Customizer.
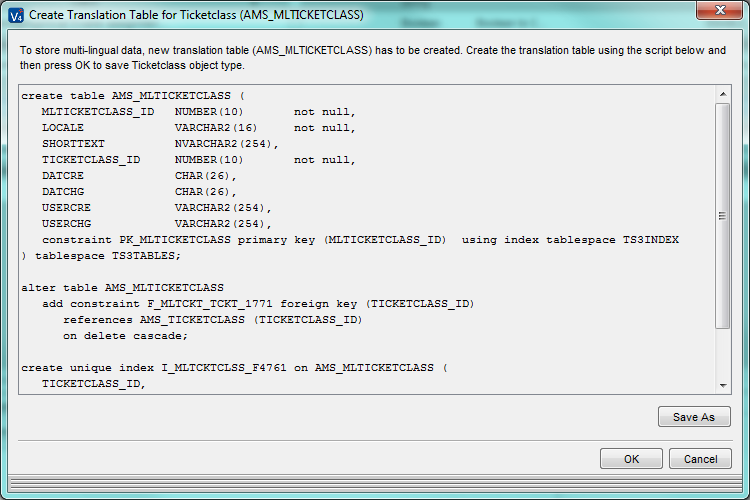
- The 'Create Translation Table... ' window opens. It contains automatically generated script which can be used to generate multilingual support at the database level, i.e. to create a new translation table or update an existing one - see note below for explanation.
To use the generated script, you can do one of the following:
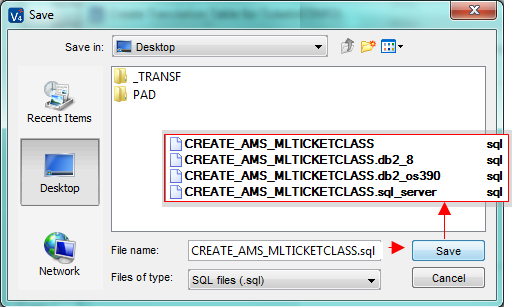
- Click the 'Save As' button in the 'Create Translation Table... ' window to save the script. The script will be saved in a separate sql file for each of the supported database formats.
- Select the script in the 'Create Translation Table... ' window and copy it to the clipboard for further use
Note: If you are specifying the first translated attribute of the object type, a translation database table needs to be created at this step. If at least one translated attribute already exists in this object type, then the already existing translation table needs to be updated with the new translated attribute. The 'Create Translation Table...' window, which opens in either case, provides script according to the situation.
- Click the 'Save As' button in the 'Create Translation Table... ' window to save the script. The script will be saved in a separate sql file for each of the supported database formats.
- Open your database administration tool and use the script acquired in step 4 to create or update the translation table. (Translation tables can be recognized by letters ML at the beginning of their name. For example, table 'AMS_MLTICKETCLASS' is a translation table belonging to translated table 'AMS_TICKETCLASS'.)
If you are not in a position to modify the database yourself, you will need to contact your database administrator. If this is the case, skip the remaining numbered steps and read paragraph 'Enrolling the help of an administrator' below.
- Save the database changes and switch back to Valuemation. Click 'OK' in the 'Create Translation Table... ' window. This finishes the customization necessary for multilingual support.
- Restart Valuemation for the changes to take effect.
Enrolling the help of an administrator
Step 5 of the above described procedure requires you to create or modify a database table. If you do not have the necessary tools or permissions, perform steps 1 to 3 of the procedure and then proceed as follows:
- In step 4, use the 'Save As' button to create the sql files.
- 5. Pass the sql files to your database administrator and ask the administrator to commit the changes.
If you need to close Valuemation in the meantime, remember which attribute you specified as 'Translated' and exit the object type customizer without saving the changes. The database needs to be modified first.
(If you click 'OK' in the 'Create Translation Table... ' window before the database table has been created, you receive a message reminding you to create the table. Clicking 'Apply' in the object type customizer opens the 'Create Translation Table... ' window again. Make sure that the database table has been created before trying to apply the changes.) - 6. After your database administrator confirms that the sql file (the version suitable for your database platform) has been committed, go back to the object type customizer, specify the same attribute as 'Translated' (by checking its 'Translated' check box in the 'Attributes' tab) and click 'Apply' at the bottom of the object type customizer.
- 7. The 'Create Translation Table...' window opens. This time there is no need to save or copy the sql script, just click 'OK' in the 'Create Translation Table... ' window.
- 8. A confirmation dialog opens. The dialog also contains information about the performed customization changes.
Click 'Yes' to restart Valuemation so that the changes take effect.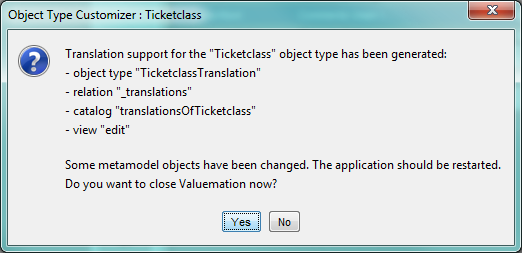
Database modification performed directly by Valuemation
A possibility exists to have Valuemation perform the necessary database modification. In this case, the 'Create Translation Table... ' window provides an 'Execute' button which can be used to commit the sql script without the need to use any external database tool. However, for security reasons access to this feature is restricted only to administrators with sql console enabled.