|
|
|
|
|
To add components to a system using the 'Configure the System' action:
- Select the system in a systems catalog and call action 'Configure the System' from the right-click context menu.
- The Configure System window opens. The window is split into two halves. The left half represents the configured system, the right half displays by default (configurable by settings) a stock system used as a component source pool.
- Set the effective date for the action. This is the date when the new configuration will take effect.
- In both panes, each system is displayed as a tree structure. Use component check boxes to mark the components intended to take part in the configure action.
Components can be added as root components or as subcomponents.
- To add a component as a root component: Select the component check box in the source system (the right pane) and select the system (root) check box in the configured system (the left pane). Then proceed to step 5 below.
- To add a component as a subcomponent of another component in the configured system: Select the component check box in the source system (the right pane) and select the check box next to the component whose subcomponent the newly added component should become. Then proceed to step 5 below.
- Use the right-to-left arrow button between the left and right pane to move the component(s) selected in the source system (on the right) to the target system (on the left). You can modify the process of adding components by several options:
- With Subcomponents: Select this check box if the selected components should be transferred together with their subcomponents.
- Subcomponents Spanning System: Select this check box if subcomponents should always be assigned to the same system as their supercomponent. In most cases this is he desired setting.
- Match Case: Select this check box to make searching and filtering in the left and right pane case sensitive.
For instance, to search case-sensitively for a particular component in the system to be configured, keep 'Match Case' selected, type the filtering criteria in the 'Component' field and select the 'Filter' check box next to the 'Component' field.
- Status of Components: Select the component status to be automatically assigned to the transferred components. If no status is selected, status of moved components will not change.
- Clicking 'OK' to confirm the changes and close the window.
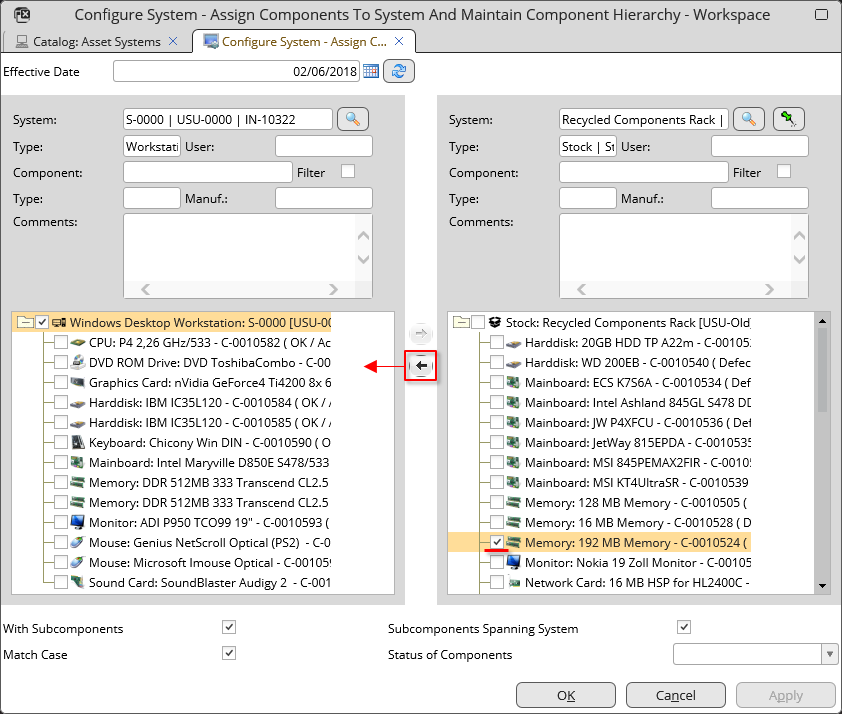
Adding a component to a system