|
|
|
|
|
Kanban Workflow Example: Processing an Incident
Typical use case scenario: Manuel is the 1st Level agent. He uses Kanban as his primary tool for managing Incidents. Not only does he open tickets but he is also able to solve them immediately if it is possible. He starts at around 8 a.m. leaving at 5 p.m.. Now let's assume Manuel has arrived at work and is going to check Kanban.
The following actions are involved in the process:
|
Kanban Board |
The action calls Kanban which is the main starting point of the Incident processing. See also Calling the Kanban. |
|
|
Drag & Drop |
Allows you to select an object in the Kanban Boards by grabbing it and dragging it to a different column. |
|
|
|||

Processing an Incident in Kanban consists of the following stages:
- Stage 1: Call the Kanban
- Stage 2: Backlog Check
- Stage 3: Incident in Progress
- Stage 4: Incident Waiting
- Stage 5: Incident Solved
- Stage 6: Incident Closed
Call the Kanban
To start the Kanban board:
- Use one of the methods described in the Calling the Kanban topic to start Kanban.
- Click the Kanban Board tile.
The Kanban opens in the workspace.
Backlog Check
When checking the Backlog column in the board, you can see that there are two new Incidents. The Incidents are assigned to a support group (my support group).
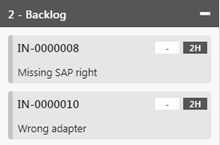
Note: The 'Created' columns on the right side contains Incidents which have already been assigned to me (my Person).
If you right-click the card, the context menu with the following options appears:
- Visualizer
Opens the Incident with its relations to other objects in the Visualizer.
- Edit
Opens the Incident in an editor where you can see the full Ticket information in context.
- Assign Incident
Allows you to assign the Incident to another person.
If you do so, the Incident card will disappear from your board and will become part of the board of the person the Incident has been assigned to.
Incident in Progress
Select an Incident in the Backlog and Drag & Drop to the In Progress column.
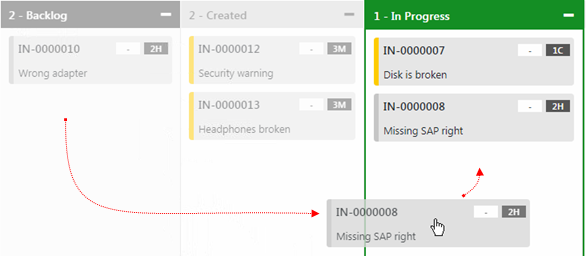
Note that this operation is not just a simple graphical change within the board.
Moving the card to another column results in:
- The Incident status value has been physically changed. This applies to any other Drag & Drop actions in the board.
- A person performing this operation is assigned as the current person of the Incident.
- The color of the card has changed according to the selected rendering color scheme.
If you right-click the card, the context menu with the following options appears:
- Visualizer
Opens the Incident with its relations to other objects in the Visualizer.
- Edit
Opens the Incident in an editor where you can see the full Ticket information in context.
- Assign Incident
Allows you to assign the Incident to another person.
If you do so, the Ticket Forwarding dialog appears.
Fill in the mandatory fields and click OK. The Incident card will disappear from your board and will become part of the board of the person the Incident has been assigned to.
- Wait for.... (Change, Customer, Major Incident, Problem)
Because it is possible to execute more than one action for this column, you have to select the desired action.
Please see also the 'Incident Waiting' section below.
- Solve Incident
Allows you to proceed with the Incident and put it directly into the 'Solved' status.
Incident Waiting
The Incident being in 'In Progress' status, now you can do one of the following:
- If you are waiting for an external input, Drag & Drop the Incident card to the Waiting column.
- If you know the solution, Drag & Drop the Incident card directly to the Solution column.
|
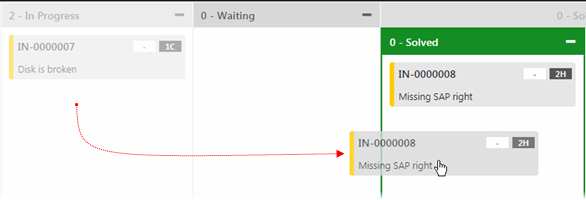
First let's put the Incident from the In Progress column to the Waiting column.
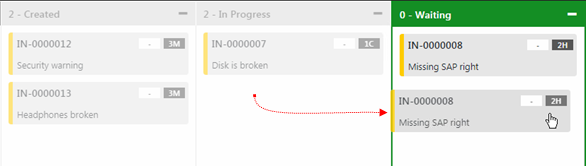
When you Drag & Drop it there, the Choose Action dialog appears.
Because it is possible to execute more than one action for this column, you have to select the desired action.
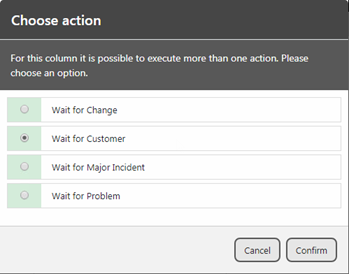
The Choose Action dialog contains the following options:
- Wait for Change
- Wait for Customer
- Wait for Change
- Wait for Problem
Note: All of the 'Wait' options are directly associated with a special status value of the Incident. When you select one of the options, the Incident object status changes accordingly in the background too.
Select the desired option and click Confirm.
If you right-click the card, the context menu with the following options appears:
- Visualizer
Opens the Incident with its relations to other objects in the Visualizer.
- Edit
Opens the Incident in an editor where you can see the full Ticket information in context.
- Assign Incident
Allows you to assign the Incident to another person.
If you do so, the Ticket Forwarding dialog appears.
Fill in the mandatory fields and click OK. The Incident card will disappear from your board and will become part of the board of the person the Incident has been assigned to.
Incident Solved
You may also want to put the Incident from the In Progress column directly to the Solved column.
When you Drag & Drop it there, the Ticket Description - Solution dialog appears.
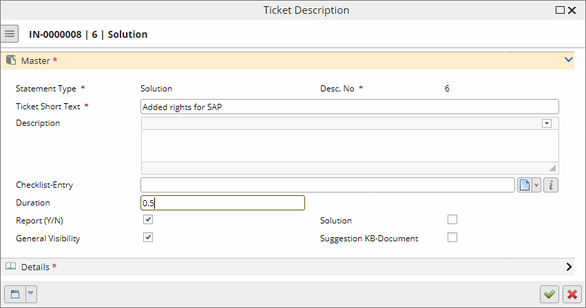
Here you can describe the solution and click OK to close the dialog.
If you right-click the card, the context menu with the following options appears:
- Visualizer
Opens the Incident with its relations to other objects in the Visualizer.
- Edit
Opens the Incident in an editor where you can see the full Ticket information in context.
- Close Incident
Allows you to close the Incident.
If you do so, the Incident card will be moved to the Closed column.
Incident Closed
The Incident being in 'Solved' status, now you can close it by either Drag & Dropping it to the Closed column or by selecting Close Incident from the context menu.
Note: The Incident card can be drag & dropped just to the Closed column from the Solved column.
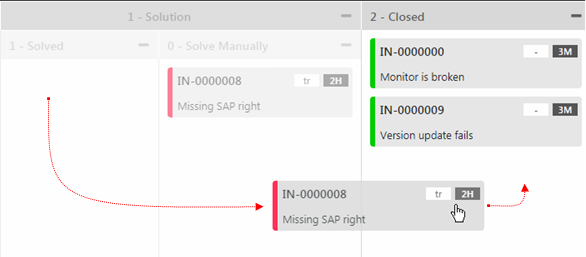
When you do so, the Incident is closed.