|
|
|
|
|
Start Page Operations
Add new tiles to the Start Page
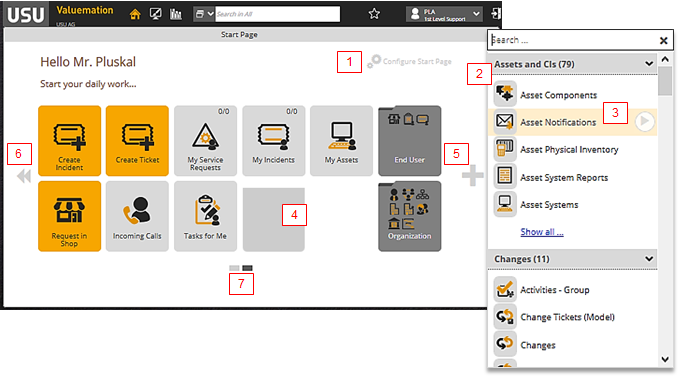
- Click 'Configure Start Page' (1). A list of all existing tiles organized by Business Categories opens (2).
- First five tiles from each category are listed - click 'Show All' to expand the list to display all tiles in the category.
- The search field at the top of the list can be used to search for tiles according to tile labels
- Hover over a tile item in the list. The tile item gets highlighted and a 'play' icon displayed (3). The position where the tile will go gets shadowed in the Start Page (4).
- Click in the highlighted line in the list to add the tile to the Start Page.
- Click the 'play' icon to launch the tile action directly from the list.
- Proceed in the same way to add more tiles to the list. Maximum of 12 tiles can fit in one page. Adding a 13th tile automatically creates another page - a subpage to the Start Page.
Add a subpage to the Start Page perspective manually
- Click the 'plus' icon (5) to add a subpage.
- An empty subpage can be deleted using the 'waste bin' icon in its center.
Navigate and move tiles between subpages
- Use the 'rewind' (6) / 'fastforward' (not shown in the screenshot) icons or the page selector (7) to navigate between subpages.
- To move a tile from one subpage to the previous or next one, drag the tile onto the 'rewind' icon on the left or the 'fastforward' icon on the right, respectively.