|
|
|
|
|
The Content Editor section comprises two editors controlling the standard and customer-specific InfoPage definitions independently. Basically, the Content Editor is based on the Rich Text Editor design with a small enhancement enabling to use workflow links on the page.
Difference between the Standard and Customer-specific InfoPage Definitions
- The Standard Definition is the default, usually pre-defined InfoPage for a particular Business View. It often serves as a pattern for the Customer-specific definition. If there is no Customer-specific definition available, the Standard Definition is used.
- The Customer-specific definition is a user-defined InfoPage content. Often it is just a slightly modified content of the Standard Definition InfoPage reflecting changes on the customer´s side. When the Customer-specific definition is available, it is automatically used prior to the Standard Definition. Creating a Customer-specific definition will preserve the user´s content during Valuemation migration.
The dominant part of the Content Editor is the Formatting toolbar. It enables you to quickly design the InfoPage layout, change common formats and easily copy formatting from selected text other text you select. The inserted attachments can be modified as well using appropriate buttons. You can also format text quickly by using known shortcut keys (CTRL+C, CTRL+U, CTRL+V etc.). Most shortcut keys that apply a particular format also remove the format (the keys act like switches, turning the format on and off).
The Formatting toolbar has the following options:
Format |
Enables you to select the required format of the text. |
Font |
Enables you to select the required font of the text. |
Size |
Specifies the font size. |
Style |
Enables you to select the required style of the font. |
|
Here you can select the style of characters. Bold, italics, underline and strike-through styles are available. |
|
Enables you to set text color. A basic chart of colors is available (after you click the drop-down button). By clicking "more colors" on the drop-down menu, you can define a more specific color if required. |
|
Enables you to set the background color of the text. The background color works like a highlighter in this case. A basic chart of colors is available (after you click the drop-down button). By clicking "more colors" on the drop-down menu, you can define a more specific color if required. |
|
Maximizes the Rich Text Editor window so that it occupies the whole browser. Click again to get it back. |
|
Using the align buttons, you can align/center the paragraph as required. By default, the editor is preset to align text flush left with the left margin, leaving a ragged right edge. |
|
Link and Unlink buttons. It is possible to create hyperlinks in the text editor on both the pictures and text segments. |
|
The workflow link button calls a dialog box which enables you to insert and/or define a link starting a Valuemation workflow. See 'Workflow Links' below for more details. |
|
These buttons enable you to insert/remove number, bullet lists and increase/decrease the indent of the text. The buttons act like on/off switches. |
|
Undo and Redo buttons. If you make a mistake when using the Editor, you can “undo” the action or command. If you decide to go through with the action after all, you can also “redo” it. Obviously, there are certain actions you can’t undo, such as saving or printing. |
|
Find and Replace functions. These actions enable you to work actively with longer text in the text field. |
|
Standard cut/copy/paste operation buttons. The paste button with the notepad symbol pastes the clipboard content as plain text only. Please see also the 'Pasting in the rich text editor' paragraph below for paste operation specifics. |
|
'Upload picture from local disk' opens a browse dialog for inserting images stored as local files. The 'Image' button opens a property editor of the currently selected image (image size, border, vertical and horizontal space, alignment etc.). |
|
Inserts a horizontal line / page break. This is usually used for printing to make the printed text well arranged. |
|
Allows you to insert a table into the editor. After you click the button, the 'Table Properties' dialog box enables you to define the table in detail (number of columns and rows, border size, cell spacing etc.). |
|
Print and Preview buttons. Use the Print button for direct printing or use the Preview button to have the print page displayed before the actual print. |
|
Enables you to switch to the source code view. When you click the button, the editor content will be displayed as a source code. |
|
|
Pasting in the Rich Text Editor
Internal distinction between text and images exists with data copied into the clipboard. Although the actual outcome of the copy/paste operation depends partially on the application from which data has been copied, the following use of paste in the rich text editor yields consistent results:
- If only text information is being pasted - use standard shortcuts CTRL+V or SHIFT+INS.
- If only image content is being pasted - several keyboard shortcuts can be used: CTRL+V, SHIFT+INS, CTRL+SHIFT+V or CTRL+SHIFT+INS, or the 'Paste picture' button in the rich text editor toolbar. Note that images can only be pasted one-by-one.
- If the pasted content consists of both text and images:
- Use CTRL+V or SHIFT+INS to paste the text. In the text, images are replaced by text 'Image removed, please use "Paste picture" instead'.
- Paste individual images using the shortcuts for image-only content pasting. Note that using CTRL+V or SHIFT+INS with mixed content will result in text with 'Image removed...' messages - be careful not to selects any text with the image when aiming for image-only pasting or make it a habit to always use CTRL+SHIFT+V, CTRL+SHIFT+INS or the 'Paste picture' button whenever images are pasted.
Note: It is important to always define dimensions (width, height) for an image. Otherwise there is a possibility that the Start Page can be displayed with wrong dimensions and missing scrollbars!
|
Workflow Links
Links which start a Valuemation workflow can be inserted in the rich text editor.
- Workflow links can be inserted only if the functionality is enabled for the particular rich text control. To do so, open the editor in the View Customizer, locate the rich text control and set the 'Workflow Link Definitions Allowed' check box on its 'Properties' tab to 'true'. As a result, the workflow link button will be available in the rich text toolbar.
- To insert a workflow link, select the text which will start the link and click the workflow link button. The 'Define Valuemation workflow link' dialog gets opened.
- In the dialog, specify the name of the workflow to be called by the link and optionally also workflow parameters. The parameters must be defined in the JSON format:
{
parameter1name : parameter1value,
parameter2name : parameter2value
}
where parameter values can be "string", number or true/false. (A string is a sequence of zero or more Unicode characters, wrapped in double quotes. A character is represented as a single character string.)
For example, a link calling the existing 'RunlinkOpenCatalog' workflow could be defined.
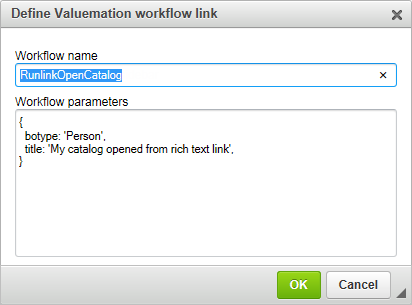
The link will open a Person catalog with the predefined title.
- To edit an existing link, use action 'Edit Valuemation workflow link' from the right-click context menu on the link in the rich text editor.