|
|
|
|
|
Creating a Notification
Clicking the 'Define New Notification' button in the 'Notifications' catalog starts a wizard for creation of new notifications. The process consists of six steps:
- Define the business object type which will be monitored.
For example, if objects of the 'Ticket' object type are to be monitored, type 'Ticket' in the 'Name (not transl.)' field and click the 'Search' icon to look up this object type in the database. When the object type is found (the 'Table' field gets filled in with corresponding database table), click 'Next'.
- Specify the condition for selection of monitored objects.
- No condition - all objects of the selected object type will be monitored. Clicking next takes you right to step 3 of the wizard.
- Define condition using the complex Query Editor - clicking next will open the Complex Query Editor (link to complex search) where condition for object selection can be specified
- Copy common condition from existing catalog - use this option to copy the selection condition form an already existing catalog. Clicking next opens a list of existing catalogs for the selected object type, selecting a catalog from the list copies its condition to the notification. For example, if you want to monitor your service requests, then the object type (selected in step 1) is 'Ticket' and in step 2 you select 'Copy common condition from existing catalog' and choose catalog 'My Service Requests'.
- Copy specific condition from your own user catalog - similar as above with user-specific catalogs offered for selection of the condition
- Write technical condition as a free text (for experts) - selection this option displays a text field where selection condition can be typed manually. It is also possible to use this option in combination with copying the condition from a catalog, which makes it possible to use an existing catalog condition and edit it. To do so, use one of the 'Copy common/specific condition...' options first, click the 'Back' button to go back to step 2 of the wizard and use the 'Write technical condition...' option.
- Specify the actual condition which triggers the notification.
Notifications are triggered when the count of the monitored objects reaches a certain condition, namely if the number of monitored objects is greater or smaller than a specified threshold. These triggering conditions are set in step 3. Additionally, page 3 of the wizard provides the 'Count objects' button - a helpful tool which can be used to determine how many objects fulfilling the currently specified condition exist, i.e. if the condition you have just specified is a "meaningful" one. To do so, click the 'Count objects' button and see the 'Last Count' field for result.
- Specify properties of the notification email.
The only means of notification currently available is sending an email. In step 4 this notification email can be set up. In the fields available here (To/CC/BCC, Subject and Text), the functions used in standard Valuemation email templates can be used. See 'Used Email Functions' for information on using these functions.
- Specify notification timing.
In step 5, the timing of condition check and notification timing is specified. 'Check Period' determines how often notification condition is checked, 'Notification Period' determines how often a notification is sent on the basis the check. Logically it only makes sense to set notification period equal to or longer than check period. (When the check is performed without a notification being sent, its result is still visible in the 'Last count' field of notifications catalog and editor.)
What happens if a multiple of the check period and the notification period do not coincide? See the following illustration and the explanation below: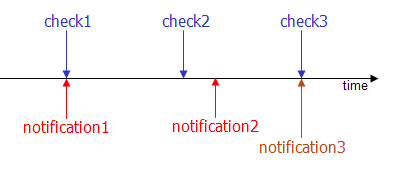
In the illustration scenario above, check2 happens before notification2. As a result, notification2 does not get sent out. Instead, the fact that a notification was to be sent out is registered and the notification is sent with the next check, effectively restarting the notification cycle. - Specify notification name and click 'Finish'.